
Annex T-1: Compliance Guideline – Requirements for Microbiological Monitoring of Process Controls in Livestock and Ratites Abattoirs
On this page
- Part I - General requirements
- Part II - Specific sampling requirements
- Part III – Canadian Food Inspection Agency verification activities and enforcement actions
- Addendum 1 – Testing summary table
- Addendum 2 – Specific sample collection procedures for livestock and ratites
- Addendum 3 – This is a technical information provided for information purposes in case of sampling a microorganism.
- Addendum 4 – Figures and illustrations
Part I - General requirements
1 - Introduction
The Food Safety and Inspection Service (FSIS) regulations, specifically Title 9 of the Code of Federal Regulations (CFR) 310.18 (c) and (d): Contamination of carcasses, organs, or other parts, 310.25(a) : Contamination with microorganisms; process control verification criteria and testing; pathogen reduction standards, and 381.94(a) : Contamination with microorganisms; process control verification criteria and testing; pathogen reduction standards for establishments that slaughter ratites, prescribe that operators of all slaughter establishments shall collect samples for microbiological analysis from carcasses of livestock (cattle, swine, sheep, goat and equine) and ratites that it slaughters. Operators of abattoirs must implement microbiological testing programs to measure and monitor the effectiveness of their process hygiene control measures (dressing and sanitation) in preventing contamination of edible meat products.
Operators of Canadian abattoirs eligible to export meat or meat products derived from livestock and ratites to the US shall incorporate into their Hazard Analysis and Critical Control Points (HACCP) system written microbiological testing procedures to monitor performance of their process controls using the FSIS established Performance Criteria or, in the absence of such criteria, statistical performance criteria they must establish through the use of a statistical process control technique. Operators are expected to take appropriate corrective action when the testing results obtained indicate loss of process control.
The monitoring sampling and testing program developed, implemented and maintained by the operator must address all applicable elements of the requirements set out in this Annex.
The Canadian Food Inspection Agency (CFIA) will monitor the implementation by the operator of the required microbiological monitoring program.
2 - Requirements for the microbiological monitoring sampling and testing program to be developed by the operator
The program shall be detailed to the extent necessary to enable verification activities and should include the following elements:
- a list of livestock species/ratites slaughtered at the establishment ranked by descending slaughter volume along with sampling plan applicable to the establishment
- a description of the sample collection procedures, including how random sampling is achieved, how the sample is taken, aseptic technique, and how samples are handled to ensure their integrity for example, temperature parameters, date and time collected, tamper-proofing measures; and the name and title of the designated establishment employee(s) (DEE) to collect the samples for testing
- pre-sampling preparation: for example, check list of tasks to be performed prior to sample collection, materials needed for sample collection, verification of the suitability of materials before testing (for example: sponges checked to ensure they do not have bactericidal properties)
- information on the analytical method used to analyze the samples and identify the laboratory performing the analysis. The method used should be validated by a recognized independent testing body such as Association of Official Analytical Chemists (AOAC)
- the microbiological organisms (for example, E. coli biotype 1or other indicator organisms, such as aerobic plate count (APC), total coliform, Enterobacteriaceae) that will be tested for
- the locations within the process where samples are collected
- the frequency of sample collection, sampling site and method
- shipping procedures (if applicable): for example, who packages, where is packaging done, where are samples kept pending shipment, who ships samples; where are samples shipped(laboratory)/how are samples shipped (shipping agent), chain-of-custody
- compilation and analysis of results / record keeping activities: for example, unit of measures, who receives test results, who reviews and compiles results, where will lab reports/worksheets (table or a chart) be kept, how long are records kept, how is CFIA Veterinarian-In-Charge (VIC) access to results provided
- FSIS Performance Criteria that will be used for example, "m" and "M" values, or in absence of such criteria, the method used to set the statistical process control performance criteria, the limits established and the charting of test results
- internal monitoring/verification activities to be conducted to ensure that the testing program is executed as designed
- corrective action procedures: for example, for inconclusive results, for non-compliance with procedures as found during the operator's internal verification activities, for E. coli (or other microorganism tested for, when applicable)results exceeding action levels indicating possible loss of process control
Note: Reference may be made to an establishment's general sample collection procedures provided that the references are to the procedure specific sections and that details specific to this sampling program are provided. Procedures should also be incorporated into the establishment's HACCP system.
The VIC shall review the program to verify that all the requirements set out in this Annex are met.
The operator's program shall be made available to the VIC upon request.
3 - General sampling policies
3.1 Pre-sampling preparation procedures
Sample collection will be carried out by the employee(s) designated (DEE) in the operator's verification sampling and testing program. Sampling supplies, such as sterile gloves, sterile sampling solutions, hand soap, sanitizing solution, etc., as well as specific materials needed for sampling different carcass types (for example, specimen sponges in bags and template for sampling cattle or swine carcasses), will need to be assembled prior to beginning sample collection.
When sponges are used, a verification of the sponges' suitability must have been done (see also Addendum 3 procedure 2 "How to prepare the sponge and template for sample collection (Attachment 2 to FSIS Directive 10,250.1 (PDF 5,087 kb)). Sponges must not possess antimicrobial properties which might reduce bacterial counts. Supplier certification (for example, letters of guarantee) shall be obtained for each new lot or in-house verification of each new lot of sponges shall be performed).
Such verification typically should consist of immersing a sponge for a number of hours within a seeded bath of transport medium (for example: Butterfield's phosphate diluent (BPD) to simulate shipping conditions. The bath containing indicator organisms in a known quantity is cultured at the end of the period to verify if the concentration of bacteria has decreased significantly, which would indicate that substances within the sponge are killing bacteria.
For cattle, swine and equine carcass sampling, a template will be needed to mark off the area to sample. The template can be made of metal or aluminum foil, brown paper, flexible plastic, etc. Some disposable templates may come sterilized and individually prepackaged. To make a reusable template for cattle and swine, cut out a 10 centimeter (cm) x 10 cm square from a sheet larger than the area to be sampled (see figure 33). For sheep and goats, the template shall be 5 cm x 10 cm.
If a reusable template is used, it will need to be sanitized with an approved sanitizing solution [for example, hypochlorite (bleach) solution or alcohol] for at least 2 to 3 minutes. However, the template needs to be totally dry before placing it on the carcass. Aluminum foil or paper templates can be used once and discarded. The foil for the template should be stored in a manner to prevent contamination. Since the area enclosed by the template will be sampled, take care not to touch this area with anything other than the sampling sponge. Using dirty or contaminated material may lead to erroneous results. If an autoclave is available, paper or aluminum foil templates can be wrapped in autoclavable paper and sterilized.
Sterile sampling solutions, BPD can be stored at room temperature. However, at least on the day prior to sample collection, check solutions for cloudiness. Do not use solutions that are cloudy, turbid or contain particulate matter. Place the number of containers of sampling solution, BPD, that will be needed for the next day's sampling in the refrigerator. Ensure that shipping containers, coolant packs and shipping documents are prepared as required.
Sterile buffered peptone water (BPW) can be substituted for BPD. It must be noted however that there may be a slight rise in bacteria counts following this change (¼ log increase). If process verification criteria have been published by United States Department of Agriculture (USDA) for the sampling method used, marginal ("m") and unacceptable ("M") limits are not allowed to be changed.
3.2 Procedure for the random selection of carcasses (see also relevant sections on random sampling of Part 2 for details)
Samples are to be taken randomly at the required frequency.
The operator's program must clearly explain how the random selection of samples is achieved. Every carcass (for cattle, every half-carcass), should have an equal chance of being selected from all eligible half-carcasses/carcasses. If multiple lines exist, randomly select the line for sample collection for that interval. Repeat the random selection process for the next sampling interval. Each line should have an equal chance of being selected at each sampling interval.
Use of random numbers tables or similar random number generating systems (for example, computer- generated, calculator generated, drawing cards, etc.) is required.
If more than 1 shift is operating at the plant, sample(s) can be taken on any shift, provided the number of samples corresponds to the total day's production and that time, site and carcass requirements have been met.
3.3 Procedures to ensure aseptic sampling techniques
Micro-organisms from the environment, hands, clothing, sample containers, sampling devices, etc., may lead to erroneous analytical results. Stringent requirements for microbiological analysis are necessary: use of aseptic sampling techniques and clean, sanitized equipment and supplies are of utmost importance.
There should be an area designated for preparing sampling supplies, etc. A stainless steel, wheeled cart or table would be useful during sampling. A small tote or caddy could be moved to the location of sampling and could be used for carrying supplies, supporting sample bags when adding sterile solutions to sample bags, etc.
Sterile gloves should be used for collecting samples. The only procedures which may contact the external surface of the glove are the exposed sample being collected and/or the sterile sample utensil (specimen sponge). Keep in mind that the outside surfaces of the sample container are not sterile. Do not handle the inside surface of the sterile sample containers. Do not touch anything else. The following procedure for putting on sterile gloves can be followed when collecting samples (see also Addendum 3 procedure 1 "How to put on sterile gloves"): Attachment 1 to FSIS directive 10,250.1 (PDF 5,087 kb).
- peel open the package of sterile gloves from the top without contaminating (touching, breathing on, contacting, etc.) the exterior of the gloves
- remove the first glove by holding it from the wrist-side opening inner surface. Avoid any contact with the outer surface of the glove. Insert the washed and sanitized hand into the glove, taking care not to puncture the glove
- remove the second glove by holding it by the cuff (outer surface). Avoid contaminating the outside of the first glove when pulling on the second glove. Take care not to touch the face, skin, clothes and other non-sterile surfaces
- if at any time you are concerned that a glove may be contaminated, discard it and begin again with Step (1) above
3.4 Preparation for sample collection
Prior to collecting samples, review appropriate sampling steps, random selection procedures, and other information that will aid in sample collection.
On the day prior to sample collection, after checking for cloudiness/ turbidity, place the number of BPD containers that will be needed for the next day's sampling in the refrigerator/cooler. If samples are to be shipped to an off-site facility, pre-chill shipping container and refrigerator packs.
On the day of sampling, gather all sample collection bags, sterile gloves, sanitizer, hand soap, sterile solutions for sampling, and specific materials listed in the sample collection section for the type of carcass to be sampled. Ensure that all sampling supplies are on hand and readily available before beginning sample collection.
Label the sample bags before starting the sampling procedure. Use permanent ink. If you are using paper labels, it is important that the label be applied to the bag at normal room temperature; it will not stick if applied in the cooler.
Outer clothing (frocks, gloves, head gear, etc.) worn in other areas of the plant should be removed before entering the sampling area or preparing to collect samples. Replace outer clothing removed earlier with clean garments (for example laboratory coat) that have not been directly exposed to areas of the plant outside of the sampling area.
Sanitize the sample work area surfaces by wiping with a clean disposable paper towel dipped in a freshly prepared 500 ppm (parts per million) sodium hypochlorite solution (0.05% sodium hypochlorite) or other approved sanitizer which provides an equivalent available chlorine concentration. The sample work area surfaces must be free of standing liquid before sample supplies and/or product containers are placed on them.
Before sampling, thoroughly wash and scrub hands to the mid-forearm. Use antibacterial hand soap. If available, this should include a sanitizer at 50 ppm equivalence available chlorine. Dry the hands using disposable paper towels.
Note: Please see Addendum 2 – Specific sample collection procedures for livestock and ratites and Addendum 3 – This is a technical information provided for information purposes in case of sampling a microorganism.
3.5 Sample shipment procedures
If samples must be sent off-site, they need to be maintained at refrigeration temperatures until transport and shipped refrigerated to the laboratory performing the analysis.
It is important that samples fit easily into the shipping containers so that the sample bags do not break. Correct use of refrigerant gel-ice packs and proper packing of the shipping container are necessary to ensure that samples arrive at the laboratory at an acceptable temperature. Some bacteria may be damaged by temperatures that are too cold, while temperatures that are too warm can allow bacteria to reproduce. Maintaining samples at improper temperatures may cause inaccurate sample results. Frozen samples or samples which are too warm (>10°C) are not considered valid and must not be analyzed.
The sample should be kept refrigerated, "not frozen", in the shipping container prior to pick up by the courier service. The shipping container, itself, should not be used as a refrigerator. However, multiple samples (if needed) for 1 day may be stored in an open shipping container kept in the cooler or refrigerator.
The following packaging procedure can be used:
- pre-chill shipping container by placing the open shipping container in the refrigerator at least the day before sampling
- place the appropriately labelled, double-bagged sample(s) in the pre-chilled shipping container in an upright position to prevent spillage. Newspaper may be used for cushioning the sample and holding it in the upright position. If more than 1 sample is collected during the day, take steps to ensure that samples are maintained at refrigeration temperature. Refrigeration temperatures help limit multiplication of any microorganisms present which ensures the most accurate results
- place a corrugated cardboard pad on top of samples. This corrugated cardboard pad prevents direct contact of frozen gel packs with the samples. Next place the frozen gel pack(s) on top of the corrugated pad. Use sufficient frozen coolant to keep the sample refrigerated during shipment to the designated laboratory. Insert foam plug and press it down to minimize shipper head space
- ship samples (via overnight delivery or courier) to the assigned laboratory
When shipping samples, the method used to protect against sample tampering shall be described in the written sampling protocol.
Note: Please refer to Addendum 2 – Specific sample collection procedures for livestock and ratites for specific sample collection procedures.
4 - Requirements for laboratories
4.1 On-site laboratories
Operators may conduct their own analyses. To prevent cross contamination, it is recommended that a microbiological testing laboratory be segregated from manufacturing areas and that access to the laboratory space be limited. If the establishment will be performing testing for pathogens onsite, then they should have the following additional safeguards in place to ensure food safety and security:
- follow requirements for Biosafety Level II laboratory operation as outlined in Biosafety in Microbiological and Biomedical Laboratories (BMBL) (PDF 4,124 kb).
- restrict access to the laboratory to trained staff
- ensure the laboratory is operating under the supervision of a qualified microbiologist or equivalent
It is expected that operators will conduct their sampling in a manner that does not jeopardize the integrity of the sample or the reliability of the test results. Establishment laboratory employees might have a copy of the AOAC procedures or articles from peer-reviewed scientific journals that describe their procedure.
The "Guidelines for E. coli Testing for Process Control Verification in Cattle and Swine Slaughter Establishments" (PDF 512 kb) provide the following suggested criteria for laboratories. The suggestions are not meant to be exhaustive. Specific needs will vary from 1 processor to another.
Personnel
Both laboratory analysts and supervisors must have education, training, and experience in food microbiology. Personnel should be well versed in methods of analysis for samples and the organisms associated with the products
Facilities
Laboratory facilities should be suitable for conducting routine and specialized microbiological. analyses and should provide adequate bio-safety precautions. It is crucial that the laboratory maintain separate, defined areas for sample receipt, preparation, and analytic work
Equipment
The laboratory should have suitable equipment, appropriate preventive maintenance programs, readily available equipment manuals, and log books for documentation. Specialized equipment may be necessary for some applications
Operations
The laboratory should have in place a written quality assurance (QA) program that is available to all employees. The QA program should include bio-safety equipment, media preparation, microbiological methods and procedures, control programs, equipment control, culture maintenance, sample receipt, handling, result reporting, and record keeping
Records
Records should contain a complete sample description, including condition, source, lot code, date, quantity, etc. Results should be reported promptly and all data and summaries permanently recorded with the results.
4.2 Outside laboratories
Operators may choose to have samples analyzed by an outside laboratory. Accredited laboratories that have on their scope of methods, the accepted method(s) of analysis selected by the operator automatically are deemed to meet applicable requirements (List of Standards Canada Council accredited and CALA accredited laboratories).
4.3 Requirements for samples
To obtain the most accurate results, samples should be analyzed as soon after collection as possible. A sample should arrive at the laboratory and be analyzed no later than the day after it is collected. Laboratories shall not analyze samples which are frozen or too warm (for example, > 10°C).
To ensure sample integrity and an accurate bacterial count, a sample should arrive at the laboratory and the analysis initiated within 48 hours of collection. If the shipment and the initiation of the laboratory analysis cannot be accomplished within 48 hours of the sample collection, the carcass or product selected for sampling should be held under refrigeration and not sampled until the shipping and initiation of the sample analysis can be accomplished within 48 hours of sample collection. The same principle applies for samples that are analyzed in-plant: if the sample cannot be processed for testing within 48 hours of collection, the carcass selected for sampling should be held under refrigeration and sample collection delayed until the sample can be processed for testing within 48 hours of collection. FSIS recommends including the sample date and the date the laboratory started processing the sample to be included in the establishment records.
Sponge or excised tissue samples should not be held for an extended period prior to analysis. They should be analyzed in-plant within 48 hours or shipped on the day of collection for overnight delivery to the laboratory that will conduct the analysis shortly after the sample arrives. Sponge or excised tissue samples should be held at refrigerated temperatures, not frozen, and shipped cold to the laboratory in an insulated shipping container with frozen gel packs. Lastly, the identity and security of all microbiological samples should be maintained during shipping and analysis to ensure the integrity of the test results.
4.4 Analytical methods
The test method used should be validated for the target organisms and for the sample matrix being analyzed to ensure accuracy of the results. It should also be a method validated by a recognized independent body, such as the AOAC.
Generic E.coli: Samples must be analyzed using 1 of the E. coli (Biotype I) quantitation methods found in the Official Methods of AOAC International, 16th edition, 3rd revision, 1997, or by any method that is validated by a scientific body in collaborative trials against the 3-tube Most Probable Number (MPN) method and that agrees with the 5% upper and lower confidence limits of the appropriate MPN index.
The following methods for generic E. coli quantitation in foods have been AOAC-approved:
- 3-tube MPN method - AOAC 17.2.01-17.2.02
- Modified 3-tube MPN method - AOAC 17.3.07 - Substrate supporting disc method (ColiComplete®). ColiComplete® substrate supporting discs are available from BioControl Systems, Inc., 19805 North Creek Parkway, Bothell WA 98011
- Modified 3-tube MPN method - AOAC 17.4-01 - Fluorogenic assay for glucuronidase. Lauryl sulfate tryptose broth with added 4-methylumbelliferyl-O-D-glucuronide (MUG) is used in a 3-tube MPN method
- Plating Method - AOAC 17.3.04 - Dry rehydratable film (Petrifilm E. coli Count Plate) method. Medical-Surgical Division/3M, 275-5W 3M Center, St. Paul MN 55144
- Filtration/Plating method - AOAC 17.3.09 - Hydrophobic Grid Membrane Filter/MUG (ISO-GRID) Method. QA Life Sciences, Inc., 6645 Nancy Ridge Dr., San Diego CA 92121
FSIS has also made available a list of Foodborne Pathogen Test Kits Validated by Independent Organizations (PDF 1,784 kb) for the detection of relevant foodborne pathogens (for example, Salmonella, Campylobacter, E. coli O157:H7, and Listeria spp. including L. monocytogenes). These lists are intended to be informational and are not an endorsement or approval of any particular method, regardless of its inclusion in the list.
Note: For most quantitative assays, week-end laboratory work can be kept to a minimum by refrigeration of incubated plates/tubes until Monday. A programmable refrigerated incubator is useful in such cases. For commercially available methods follow manufacturer's recommendations.
4.5 Suggested quantitation schemes
If a generic 1 ml plating technique is used for E. coli quantitation for cattle or swine carcass sponging sample analysis, the plate count needs to be divided by 12 to equal the count per cm2 of carcass surface area, according to the following calculations:
Total surface swabbed: 3 x 100 cm2 = 300 cm2
Total quantity (volume) of fluid: 10 + 15 ml = 25 ml
Conversion factor calculation: if 25 ml for 300 cm2, then 1 ml for x cm2 and x = 300 ÷ 25 = 12
To cover the marginal and unacceptable range for E. coli levels (section 6 of part I), the undiluted sample extract, as well as 1:10, 1:100, 1:1,000 and 1:10,000 dilutions should be plated, preferably in duplicate. Higher or lower dilutions may need to be plated based on the specific product.
If a hydrophobic grid membrane filtration method were used, the only difference is that filtrations shall be performed on 1 ml of the undiluted sample extract, as well as of 1:10, 1:100, 1:1,000 and 1:10,000 dilutions.
Additional dilutions of the original extract may need to be used if a 3 tube most probable number (MPN) protocol is used. The 3 highest dilutions that were positive for E. coli are to be used to calculate the MPN. For cattle and swine samples collected by swabbing technique, MPN values from the appropriate MPN table represent the count per ml of original extract and therefore needs to be divided by 12 to obtain the count per cm2 of carcass surface area.
Laboratories shall report the exact E. coli count. Where values are quantified below 1 cfu/cm2, the exact count should be reported (for example, 0.01 cfu/cm2) - zero (0) shall not be reported as a test result. Methods used must have a minimum sensitivity of at least 5 cfu/cm2 carcass surface area for cattle and swine.
5 - Performance criteria
FSIS has developed E. coli Biotype 1 (generic E. coli) performance criteria for beef and pork carcasses using the excision sampling technique (PDF 512 kb). Performance criteria are numbers published in the regulations that represent the highest expected microbial loads on carcasses when the slaughter process is under control. They give livestock slaughter establishments guidance about the effectiveness of their slaughter process in preventing fecal contamination. Test results that meet the criteria in the regulations provide evidence that the establishment is maintaining adequate process control for fecal contamination and sanitary dressing.
| Type of livestock | Lower limit of marginal range (m) | Upper limit of marginal range (M) | Number of samples tested (n) | Maximum number permitted in marginal range(c) | ||||
|---|---|---|---|---|---|---|---|---|
| Cattle | Negative Table Note a | 100 cfu/cm2 | 13 | 3 | ||||
| Swine Table Note b | 10 cfu/cm2 | 10,000 cfu/cm2 | 13 | 3 | ||||
| Test # | Date | Time collected | Test result (cfu/ml) |
Is the result above the "unacceptable" limit? > ("M") |
Is the result above the "marginal" limit? > ("m") |
# of results exceeding the "marginal" limit in last 13 tests | Is the process "under control"? (# of results > "m") ≤ 3 and no result >"M" |
|---|---|---|---|---|---|---|---|
| 1 | 10-07 (Mon) | 08:50 | 200 | No | Yes | 1 | Yes |
| 2 | 10-07 (Mon) | 14:00 | 50 | No | No | 1 | Yes |
| 3 | 10-08 (Tue) | 07:10 | 500 | No | Yes | 2 | Yes |
| 4 | 10-08 (Tue) | 13:00 | 5 | No | No | 2 | Yes |
| 5 | 10-09 (Wed) | 10:00 | 80 | No | No | 2 | Yes |
| 6 | 10-09 (Wed) | 12:20 | 50 | No | No | 2 | Yes |
| 7 | 10-10 (Thu) | 09:20 | 800 | No | Yes | 3 | Yes |
| 8 | 10-10 (Thu) | 13:30 | 50 | No | No | 3 | Yes |
| 9 | 10-11 (Fri) | 10:50 | 80 | No | No | 3 | Yes |
| 10 | 10-11 (Fri) | 14:50 | 50 | No | No | 3 | Yes |
| 11 | 10-14 (Mon) | 08:40 | 500 | No | Yes | 4 | No |
| 12 | 10-14 (Mon) | 12:00 | 80 | No | No | 4 | No |
| 13 | 10-15 (Tue) | 09:30 | 80 | No | No | 4 | No |
| 14 | 10-15 (Tue) | 15:20 | 50 | No | No | 3 | Yes |
| 15 | 10-16 (Wed) | 07:30 | 80 | No | No | 3 | Yes |
| 16 | 10-16 (Wed) | 11:40 | 5 | No | No | 2 | Yes |
| 17 | 10-17 (Thu) | 10:20 | 80 | No | No | 2 | Yes |
| 18 | 10-17 (Thu) | 14.45 | 80 | No | No | 2 | Yes |
| 19 | 10-18 (Fri) | 08:30 | 50 | No | No | 2 | Yes |
| 20 | 10-18 (Fri) | 16:00 | 80 | No | No | 2 | Yes |
| 21 | 10-19 (Sat) | 09:10 | 50 | No | No | 1 | Yes |
| 22 | 10-19 (Sat) | 13:00 | 1500 | Yes | Yes | 2 | No |
| 23 | 10-21 (Mon) | 10:30 | 80 | No | No | 2 | Yes |
The following observations can be made upon studying this example:
- as of 10-14 at 08:40, there are 4 results in the last 11 which exceed the "marginal" limit ("m"); this exceeds the maximum of tests above "m" permitted ("c" = 3) within the window ("n" = 13). The process can no longer be said to be "in control"
- the limit of 3 results above "m" in 13 consecutive samples stays exceeded for the next 2 tests. The process is still considered not to be "in control", but since no new result above the "marginal" or "unacceptable" limits have occurred, the conclusion should not be considered as evidence of a new problem. The log or documentation of corrective action taken following the initial loss of control will indicate if action was taken to address the identified deviation
- on 10-15 at 15:20 the number of results above the "marginal" limit (> "m") in the last 13 tests goes down to 3 because the original result above "m" (10-07 at 08:50) is no longer in the window after it moves ahead by one. The process can again be said to be "in control"
- the result for 10-19 at 13:00 exceeds the "unacceptable" limit (result > "M"). Even if the number of results above the marginal limit ("m") is less than the maximum allowed ("c" = 3), the process is still considered to no longer be "in control". Corrective action must be undertaken and logged by the operator because of this unacceptable result
- the result for 10-21 at 10:30 is below the "marginal" limit (< "m"). The total of marginal results is 2. The process is said to be "in control"
Figure 39 shows the same results as the above example but the results are displayed in chart form. The numbers along the horizontal axis of the graph (x-axis), refers to the test number in the chart above. The information for each test result, such as the time and date the sample was collected could also be recorded on the chart.
7 - Statistical process control
The use of statistical process control (SPC) techniques is based on the following principles:
- every product is manufactured through a process
- every process is subject to variation
- every process can be understood, described and/or measured in mathematical or statistical terms
- the ongoing performance of the process can be assessed if regular measurements are made and improvements to the process can be made until an optimum level is reached
According to SPC principles, a process is said to be "in control" when it is stable and performs in an acceptable manner for example test results range close to average and are within predicted limits. SPC techniques allow the detection of process variations which would not have been identified otherwise. Through early detection of unexpected variations, deficiencies can be readily detected and corrected.
The development of SPC programs involves an initial collection of data to determine baseline parameters characterizing the process of interest (also called baseline data; baseline level; process control level). These parameters describe what the typical or "normal" process looks like. Using a statistical method, the baseline data is used to develop process verification criteria (PVC). Many different statistical approaches can be used for SPC (for example, the moving window approach, Shewhart Control Charts, trends analysis, standard deviations, time plots, CUSUM, control charts, etc.) Once the SPC approach has been selected and the PVC developed, regular monitoring is performed and results checked against the PVC to verify if the process is operating within "normal" limits. If not, this indicates that the process is not "in control" and it is time to find and correct the possible causes for the abnormal results.
Statistical process control provides a powerful mechanism for operators to monitor and interpret the data collected for ongoing HACCP verification. Statistical process control can provide operators with an early warning that their process may not be functioning as designed. This warning can allow operators to take corrective actions or make other process modifications to bring their process back into control without actually failing the individual establishment-identified pre-determined performance criteria.
SPC requires that the operator conducts a series of preliminary generic E. coli tests during its own slaughter operations and chart the results in cfu/cm2 or cfu/ml to determine the typical range of generic E. coli counts found at their establishment under normal circumstances. After a company collects test results long enough to believe they have a true picture of their performance, they set an upper and lower control limit based on test results. There are no regulatory requirements for how statistical process controls are determined. Companies may use a variety of valid methods to determine limits for statistical process control.
An operator that uses statistical process control should assess the historical ―normal performance of the slaughter process when it was in control and developed criteria that will indicate when the process may not be in control. The establishment should use generic E. coli (or other organism tested for when applicable) testing results to identify times when the slaughter process is trending toward a loss of control and takes necessary actions to re-establish control.
An example of a method a company may use to develop a SPC program is as follows. The operator:
- conducts a series of preliminary generic E. coli tests during operations
- charts the results in cfu/cm2
- collects test results long enough to have a true picture of its performance (about 30 days usually).
- determines the typical range of generic E. coli counts found normally
- sets upper and lower control limits based on test results
The reader should refer to 1 of the following specialized references for more information on other SPC methods:
- Ishikawa, K. 1986 - Guide to Quality control. Kraus International Publications, White Plains, NY
- Kane, V.E. 1989 - Defect Prevention. ASQ Quality Press, Milwaukee WI
- Kume, H. 1985 - Statistical Methods for Quality Improvement. UNIPUB/Kraus International publications, White Plains, NY
- Surak, J.G. 1999 - SPC for the food processing Industry. Clemson University, Clemson, SC Surak, - J.G. 1999 - Integrating HACCP and SPC. Clemson University, Clemson, SC
Note: Many of these documents were developed for industrial applications other than food and examples used may not lend themselves to food production.
Part II - Specific sampling requirements
1 – Products and establishments targeted
Testing must be done on carcasses in all slaughtering establishments that are eligible to export any market class of cattle, swine, sheep, goats, horses, mules, equines, or ratites.
If a combination of types of livestock is slaughtered, the samples are taken only from the species slaughtered in the largest number. It is only necessary to sample 1 type of livestock to determine whether sanitary dressing controls are effective. Tests performed measure the effectiveness of the process regardless of which species is slaughtered. This means, for example, if an establishment slaughters both swine and sheep, but mostly swine, they should be testing swine carcasses.
Establishments are divided into 2 categories: very low volume establishments (VLV) and greater than very low volume establishments (>VLV). The categories of establishments are based on the establishment's annual slaughter volume.
Very low volume establishments are described as follows:
- Cattle, goats, sheep, horses, or other equine: annually slaughter fewer than 6,000 head
- Swine: annually slaughter fewer than 20,000 swine
- Livestock combination: annually slaughter fewer than a combination of 6,000 cattle, plus sheep, goats, horses, or equines that equal no more than 20,000 animals total
- Ratites: Annually slaughter fewer than 6,000
Establishments slaughtering more than the numbers indicated above for VLV establishments are classified as greater than very low volume establishments.
2 – Sample collection and sampling frequencies
2.1 Microbial indicator
a) Swine
Operators of swine slaughtering establishments should determine which microbial organism(s) will be most effective in assessing its process control when developing its sampling plan. Each establishment has a configuration and process unique to the facility, the food safety system in place, and the hazards deemed reasonably likely to occur.
FSIS recommends that an operator choose 1 or more indicator organism that will provide meaningful data in assessing process control. Potential indicator organisms include aerobic plate count (APC), Enterobacteriacea (EB), generic E. coli, and total coliforms. FSIS recommends an operator use APC because it is less specific than generic E. coli and provides more quantifiable data. Enumeration allows an establishment to plot these data on a process control chart and monitor trends in its data and process over time. The more quantifiable microbiological data available to an establishment, the better it can assess and subsequently control variations in its process (Williams 2015). In contrast, generic E. coli is a smaller group (subset) of the Enterobacteriaceae family of bacteria; analysis of samples for generic E. coli often results in numerous non-detectable results ("zero values") which makes it difficult for an establishment to detect changes in microbial load at different points in establishment's process, and to identify trends in its data to make process control decisions.
Operators of VLV establishments that are operating under traditional inspection may choose to continue conducting generic E. coli testing to meet the FSIS sampling requirements. FSIS considers the requirements under the former regulations for generic E. coli testing of swine to be a "safe harbor" for assessing process control.
Former provisions that FSIS considers to be integral to that safe harbor include the following:
- testing for generic E. coli, FSIS requires an establishment to collect a series of 13 samples, at a minimum, to be able to assess process control
- to collect the sample, the establishment must collect an excision or swab sample of the ham, belly, and jowl from the carcass at the end of the chilling process. FSIS Guideline: Guidelines for Escherichia coli Testing for Process Control Verification in Cattle and Swine Slaughter Establishments provides more detailed guidance on the sampling procedures (PDF 512 kb)
- laboratories analyzing the samples should use a quantitative method for generic E. coli analysis that is approved and published: 1) as an official method of the Association of Official Analytical Chemists International (AOAC International) or 2) by a scientific body based on the results of a collaborative trial conducted in accordance with an internationally recognized protocol on collaborative trials and compared against the three-tube Most Probable Number (MPN) method; this type of method must also agree with the 95 percent upper and lower confidence limits of the appropriate MPN index (9 CFR 310.25(a)(3)).
Note: The FSIS guideline on "Developing Microbiological Sampling Programs in Swine Slaughter establishments (PDF 1,162 kb)" can be consulted for more details on the new requirements.
b) Livestock other than swine and ratites
E. coli Biotype 1 Testing must be conducted on carcasses in all slaughtering establishments that are eligible to export any market class of cattle, sheep, goats, horses, mules, equines, or ratites.
2.2 Location
The location refers to the place within the establishment where the sample is collected.
a) Swine
Operators must analyze 1 carcass sample at pre-evisceration and 1 carcass sample at post-chill per sampling event; these samples do not need to be from the same carcass. Post-chill refers to a later point in the slaughter process after carcasses are chilled and all interventions have been applied prior to fabrication. It must be noted that following the application of an antimicrobial prior to the point of sample collection, a drip time of at least 60 seconds should be observed before sample collection to reduce antimicrobial carryover in the collected sample.
Hot-boning operation samples are taken after the final wash prior to boning.
Operators of VLV establishments that are operating under traditional inspection may choose to continue conducting E. coli testing at post-chill only to meet the sampling requirements in the final rule.
b) Livestock other than swine and ratites
Livestock samples are collected after they have been in the cooler for a minimum of 12 hours. There is no maximum time limit. Carcasses can be selected while on the rail or after the final wash and set aside in a convenient spot in the cooler for testing after cooling. It is acceptable to select random samples before carcasses enter the cooler.
Ratite samples are collected at the end of the chiller or drip line or at the last readily accessible point prior to packing or cut-up.
Hot-boning operation samples are taken after the final wash prior to boning.
2.3 Sampling site and method
The sampling site refers to places on the carcass where samples are collected. There are 2 sampling methods an establishment may use to collect generic E. coli samples.
- Excision
- Sponging
Excision sampling is aseptically cutting a surface section from the livestock carcass and sending the tissue sample for laboratory analysis. Sponging is aseptically swabbing the surface of the livestock carcass or ratite carcass with a sterile sponge and sending the sponge to the laboratory for analysis (please consult Addendum 2 - Testing summary table , Addendum 2 - Specific sample collection procedures for livestock and ratites, Addendum 3 – FSIS sampling procedures guidelines and Addendum 4 for details on sampling sites).
Note: For ratites, the operator must collect samples from whole ratites at the end of the chilling process. Samples from ratites may be collected by sponging the carcass on the back and thigh or samples can be collected by rinsing the whole carcass in an amount of buffer appropriate for that type of bird.
2.4 Frequency
The frequency of sampling is based on the establishment's production volume (see Addendum1: for a testing summary for livestock and ratites).
-
Very low volume establishments begin sampling the first full week they operate after June 1st. They continue collecting at least 1 sample per week in each week they operate until 13 samples are completed. The series of 13 tests must show process control before the series can be ended. If the 13th test indicates that the sanitary dressing process is out of control, the establishment must continue to test until process control is regained.
The 13 samples should not be collected in 1 day or even 1 week. Sampling over a period of time provides a better indication of the process control of the establishment than taking all samples at once.
Seasonal VLV operations must complete all E. coli testing during whichever months it operates. For example, a seasonal goat slaughter establishment that operates from September through December must begin testing during its first full week of operations and complete 13 tests before operations end in December.
When a VLV establishment that has completed 13 tests for the year makes changes like remodeling, new equipment, new employees, or new procedures that affect how well the process control measures works, weekly testing must be resumed until another series of 13 tests can establish the effectiveness of the changed process. If CFIA determines there have been changes that affect the process control measures, the information must be provided to the company in writing. The establishment would then be required to resume E. coli testing to judge the process control.
-
Greater than very low volume establishments use the following frequencies for testing
Cattle, sheep, goats, horses, or equines 1 test per 300 carcasses. Swine 1 test per 1,000 carcasses Ratites 1 test per 3,000 carcasses.
Greater than very low volume establishments must sample at the above frequencies or a minimum of at least once per week, whichever is greater. For example, an establishment that slaughters 9,000 cattle per year must sample once per week (a total of 52 samples per year), not only 30 samples per year as indicated by the 1 test per 300 carcasses frequency (30 samples for 300 carcasses = 9,000 carcasses).
Slaughter volume does not always match frequency rates in the regulations. Establishments should account for extra slaughter volume. This can be done by conducting additional tests. For example, a swine slaughter establishment that slaughters 1,500 swine per day should test at least once a day at the 1,000 carcasses per test frequency. However, the remaining 500 carcasses should also be accounted for to monitor process control. To account for the extra slaughter volume, the establishment could "carry over" the 500 extra carcasses to the next day's volume and conduct 2 tests on the second day.
2.5 Random selection of carcasses
In cattle, each half-carcass represents 1 unit eligible for sampling. Both the "leading" and "trailing" sides of a carcass should have an equal chance of being selected within the designated time frame. In other livestock species, each whole carcass represents 1 unit eligible for sampling.
To ensure that all carcasses have an equal chance of being selected, the program must emphasize:
- that the "Time" when sample is to be selected is determined in a random manner (alternatively, random selection of the carcass sequence number achieves this)
Note: The selection of carcasses (or half-carcasses) can be carried out before the carcass enters the cooler. The selected carcass can be tagged and placed in the coolers with other carcasses and directed to the sample taking site after 12 hours of chilling has been completed (where conventional chilling methods are used). Carcasses should not be placed in a special area at the beginning of the chilling process as this may misrepresent actual carcass chilling conditions.
- that, where there is more than 1 possible location for selecting the sample, the location is determined in a random manner. For example: Selection of beef, hog, sheep, goat and equine carcasses when selection is done within coolers (12 or more hours after slaughter), grading chains or other rails: the selection of the cooler and location within the cooler where the carcass is to be selected for the sampling period (for example day's production) is determined in a random manner; and the selection of the half-carcass or side of carcass to sample is randomly determined;
- where the sample selection procedure involves selecting a carcass/half-carcass at a randomly determined sampling time/sampling location, the following procedure is used to eliminate bias and ensure random selection: after having identified the carcass or half-carcass selected by the random procedure from the predetermined point, count back 5 carcasses/half-carcasses and select the next carcass/half-carcass for sampling. Each carcass/half-carcass must have an equal chance of being selected. The reason for counting back 5 carcasses/half-carcasses is to avoid any possible bias during selection.
If more than 1 shift is operating at the establishment, the sample can be taken from either shift, provided the above requirements are met.
Please refer to Addendum 2: Specific sample collection procedures for livestock and ratites for specific sample collection procedures.
3 - Charting and interpreting results
3.1 Records of test results
a) Swine
Specific techniques of statistical process control include the use of a control chart, which plots data over time but also displays an upper control limit for specific measurements and often a centerline, above and below which 1 would expect approximately an equal number of sample results, since the centerline is based on past sampling history. A sample result above the upper control limit would indicate the likely presence of a special cause of variation that should be addressed. Results within control limits indicate simply that the process is in control.
Control charts are used to:
- analyze and understand variables that affect the process
- determine process capabilities
- assess effects of the variables on the difference between target and actual performance
Test results should be plotted and evaluated in a series over time. The test result chart should be updated at a regular interval, ideally within the next business day following the reporting of test results by the testing laboratory. Every time a new test result is recorded, the oldest test in the series should be dropped from the moving window. For example, an establishment may choose to evaluate its test results in a moving window of 13 tests. The establishment would use this series of 13 tests to evaluate its process control over the period represented by the series of 13 tests. The control chart would be updated with each new test result reported, adding the new test result and removing the oldest test result on the chart.
Microbiological testing provides a measure of the extent of control at the step being evaluated and all preceding steps. By performing microbiological analyses at several points within a process it is relatively easy to identify the segment of the process where control has been lost. In addition, sanitary dressing verification and end-product testing (though not required) can provide an integrated measure of the performance of the entire process. Pre-evisceration and post-chill test results could be charted on the same graph with separate, corresponding upper control limits to better correlate the samples and calculate the log reduction between the 2 samples.
b) Livestock other than swine and ratites
Generic E. coli tests results are reported as a quantity or bacterial concentration. Bacterial concentration can be reported using either the cfu or the Most Probable Number (MPN) based laboratory methods of analysis to evaluate the generic E. coli testing.
The operator using the "m" and "M" criteria must record each test result in terms of colony forming units per square centimeter (cfu/cm2) for excision. Alternatively, an operator using SPC method may record results as cfu/cm2 or MPN/cm2 (sponge samples).
The operator must record the results on a process control chart or table that shows at least the most recent 13 test results. Records of the tables and charts (see figure 39 of Addendum 3 for an example) with generic E. coli test results must be kept for 12 months.
The information needed for each sample must include date and time of sample collection, and, if more than 1 slaughter line exists, the slaughter line from which the sample was collected.
3.2 Criteria for evaluation of tests results
a) Swine
Performance criteria are those that represent the highest expected microbial loads on carcasses when the slaughter process is under control. The generic E. coli baseline results, using the surface swab sampling technique, can serve as support to establishments that slaughter swine in assessing the effectiveness of their process, using their own test results (Generic E. coli 8058).
An establishment may also choose to use the generic E. coli performance criteria defined in the Pathogen Reduction: Hazard Analysis and Critical Control Point (HACCP) Systems; Final Rule (PDF 1,468 kb), (please consult section 5 of Part I) for samples collected using an excisional collection method. These generic E. coli performance criteria have been separated into 3 categories for process control verification: acceptable, marginal, and unacceptable. An establishment is considered to be operating within the criteria when the most recent generic E. coli test result does not exceed the upper limit (M), and the number of samples, if any, testing positive at levels above (m) is 3 or fewer out of the most recent 13 samples (n) taken.
Because each swine slaughter establishment will determine which microbial organism(s) will be most effective in assessing its process control when developing its sampling plan, additional indicator organism upper control limits are provided in the table below. The upper control limits in the table , were determined from surface swab samples based on the FSIS Market Hog Baseline Study (MHBS) and may be used for all swine species; but operators are not required to use this table. There may be some variability among swine classes. The information in the table below represents the 80th percentile limit for additional indicator organisms. Percentiles represent the percent of establishments that are below the associated number in the distribution of average bacteria indicators per establishment.
| Indicator organism | APCs | Enterobacteriaceae | Total Coliforms | E. coli | ||||
|---|---|---|---|---|---|---|---|---|
| Average cfu/cm2 | Pre-evisceration | Post chill | Pre-evisceration | Post chill | Pre-evisceration | Post chill | Pre-evisceration | Post chill |
| 4200000 | 790 | 8300 | 110 | 5500 | 35 | 3800 | 30 | |
| Distribution percentile | 80% | 80% | 80% | 80% | ||||
Nationwide Microbiological Baseline Data Collection Program: Market Hogs Survey.
An operator should aim for test results below those limits listed for its selected indicator organism at pre-evisceration and post-chill locations. Indicator organism results below the upper control limit shown in the table above indicate that the process is in control. FSIS recommends that the operator plot its data on a control chart to evaluate its test results over time, and to evaluate process control and variability in its food safety system. Additionally, FSIS recommends that operators monitor the log reduction between pre-evisceration and post-chill as an additional measure to evaluate process control.
Example
If an operator has APC test results above 790 cfu/cm2 at post-chill, its process is most likely out of control and the operator should take corrective action to bring its process back under control. Compliance Guideline for Controlling Salmonella in Market Hogs, page 29 (PDF 1,149 kb)).
An operator should evaluate its sampling data at a defined frequency and adjust its upper control limits to lower thresholds to reflect improved process control trends. It is not advisable that an operator raise its upper control limits in response to upward trends in its sampling data since its upper control limits were initially calculated based on its process being in control.
b) Livestock other than swine and ratites
- Using Performance Criteria (m/M Values) to Evaluate Test Results (Ref. Section V Part 1)
The E. coli test results are compared to the regulatory criteria and may fall into 1 of 3 categories: acceptable, marginal (represented by "m"), and unacceptable (represented by "M"). Marginal results ("m") are those that fall within the worst 20% of overall industry performance in terms of E. coli counts (results taken from baseline study). More than 3 marginal results in the last 13 tests are unacceptable. Results in the worst 2% of overall industry performance (results taken from the baseline study) are called the maximum or "M" value. Any single test result exceeding "M" is unacceptable. The m/M values are applied to a moving window of the last 13-documented test results. That means that the establishment considers all of the last 13 test results when determining if the process is in control. Every time a new test result is added to their records, the oldest test is dropped, and the new test becomes 1 of the most recent 13 results.
For the slaughter process to be judged in control no more than 3 sample results can be above the "m" marginal line. If 4 sample results are above "m", the process is out of control.
If the test result of the most recent sample is above "M", the process is automatically out of control, regardless of the previous test results. Once another test result is entered in the chart or table, the "M" test simply becomes another result considered to be above the "m" line. It no longer carries the consequence of causing "automatic" process control failure.
After the slaughter process is judged to be out of control, a subsequent test result below the "m" line indicates that the establishment did something to correct a problem and bring the process back into control. However, the process is not judged totally in control until the window of 13 tests also shows process control.
An example of how to use the table is to consider a cattle slaughter establishment that uses the excision sampling method. An E. coli test result is:
- acceptable if it comes back negative
- marginal if the test result is positive but not above 100 cfu/cm2
- unacceptable if it is above 100 cfu/cm2
An example of 1 method that may be used by operators for record keeping is shown in section VI of Part 1.
Another method the company may use to document its E. coli test results is a control chart. The test results are plotted on a chart (Please see Figure 39 for an example of a control chart).
- using SPC to evaluation test results
In absence of the Performance Criteria referred to above, the operator must use SPC to establish the criteria that will be used assess and to document generic E. coli test results. As long as the data points on the company chart stay within the control limits set by the operator, the process is considered in control.
The generic E. coli results published in the Federal Register Notice of December 17, 2005 can complement SPC by providing operators with an additional measure of process control.
The results below are for cattle carcasses sampled using the sponge method of sample collection.
| Product | Method | 80th percentile | 98th percentile |
|---|---|---|---|
| Cattle carcasses | Sponge | 0.0 cfu/cm2 | 3.1 cfu/cm2 |
3.3 Action in response to loss of process control
As part of its process control procedures, an operator should define the actions it will take if the test results obtained exceed the limits it has set. The operator should delineate what its actions will be, who will take each action, how the outcome of these actions will be documented, and how the actions will be verified.
If an operator determines that the trends in its test results indicate a loss of process control, the operator should act to investigate the root cause(s). An operator should consider how the different parts of its food safety system work together and how they affect the entire food safety system. To do this, operators should evaluate its process control procedures, sanitary dressing practices, and sanitation procedures to determine whether the root cause(s) can be identified, and subsequently, take steps to correct the problem. This evaluation should include a review of an operator's process monitoring records and its processes during normal operations. The operator should consider any implementation problems it has encountered or changes in procedures or practices, such as sanitary dressing procedures, including but not limited to:
- procedures for routine cleaning and sanitizing of equipment, including hand tools used to remove contamination or to make cuts into the carcass; The design, configuration, and calibration of equipment to ensure proper function within operational parameters to prevent contact between carcasses and parts, and to prevent contamination of carcasses;
- employee hygiene practices, such as ensuring employees frequently wash hands, equipment, utensils, and aprons that come in contact with carcasses, and that employees are properly trained when there are new or substitute employees on the line; and
- the implementation of antimicrobial or mechanical intervention treatments, such as carcass washes, sprays, or brushes, in accordance with the limits selected and supported by the establishment, including effective application to ensure coverage of the entire carcass.
Following its investigation, the operator should respond to its findings by deploying appropriate decontamination procedures and antimicrobial intervention treatments, as necessary, to address contamination that may have occurred on carcasses or parts. The operator should also take steps to initiate any necessary equipment repair or recalibration and employee training, when identified as a root cause for loss of process control.
FSIS has also made available the Compliance Guideline for Controlling Salmonella in Market Hogs (PDF 1,149 kb). The guideline summarizes potential control points for Salmonella in the pre-and post-harvest production process. Operators should use this guide to improve management practices, to ensure effective sanitary dressing procedures and to assist in investigating events of apparent loss of process control. When an operator makes changes at the appropriate locations in its process, process control should improve and result in the production of raw pork products that are within acceptable parameters, including indicator organisms and Salmonella.
Part III – Canadian Food Inspection Agency verification activities and enforcement actions
1 - Verification activities
In principle the FSIS requirements are that the operator must develop, implement and maintain a sampling and testing program as provided in this Annex. The operator is also responsible to develop and implement an action plan at the satisfaction of the VIC upon receiving results exceeding the established process verification criteria, indicating a loss of process control.
CFIA inspectors will verify that establishments meet applicable testing requirements for example, review the operator's verification sampling and testing program to confirm that is meets applicable requirements and monitor its implementation including, should the test results indicate a possible loss of control over the process, that the operator has taken or is taking necessary corrective measures to restore process control.
The following findings are evidence of non-compliance with FSIS regulatory testing requirements.
- The operator is not conducting microbiological sampling at the required location or at the required frequency according to the establishment's size and production volume
- The operator is not using the required sampling technique or sampling at the required site on the carcass
- Sample integrity, for example, randomness and handling of samples, is not maintained
- The laboratory is not using a quantitative method for analysis that is approved as an Official Method of the AOAC International or approved and published by a scientific body
- Records are not available for CFIA access or not retained for 12 months
2 - Enforcement actions
2.1 Lack of compliance with performance process control criteria
The performance criteria are guidelines, not regulatory standards. Test results that show lack of process control should be considered in conjunction with other information, like operator's effective implementation of HACCP systems to ensure that food animals are slaughtered under sanitary conditions; whether the overall pattern of inspection findings suggests that the establishment is not maintaining sanitary conditions throughout the slaughter HACCP system. For example: an operator has repetitive associated HACCP or pre-requisites noncompliance for multiple aspects of the slaughter system, or the operator's corrective actions in response to findings of visible fecal contamination are consistently ineffective – may indicate systemic problems with its slaughter HACCP system. Further enforcement action might be necessary if the establishment repeatedly fails to implement appropriate immediate action or further planned action in response to noncompliance. The VIC should discuss with their immediate supervisor the need to take enforcement.
2.2 Lack of compliance with regulatory testing requirements
With regards to non-compliance to FSIS requirements to develop, implement and maintain a microbiological monitoring sampling and testing program, should the operator not submit an acceptable corrective action plan to rectify the situation, the VIC should notify the Operations Veterinary Specialist for Meat Export or substitute and procedures to remove the establishments from the list of establishments eligible to export to the US should be undertaken.
Addendum 1 – Testing summary table
| Species | Test frequency | Test location | Sample sites | Sampling method |
|---|---|---|---|---|
| Cattle | 1/300 carcasses or 1/week – whichever is greater | Carcass cooler > 12 hrs. Hot boned: after final wash |
Flank, brisket, rump | Excision Table Note c Sponging |
| Swine VLV under traditional inspection | 1/1000 carcasses or 1/week – whichever is greater | Carcass cooler > 12 hrs. Hot boned: after final wash |
Belly, ham, jowls | Excision Table Note c Sponging |
| Swine (all other) | N/A | 1 sample at pre-chill and a sample at post-chill locations per sampling event (Need not to be taken from the same carcass) | N/A | N/A |
| Sheep and goat | 1/300 carcasses or 1/week – whichever is greater | Chilled carcasses Hot boned: after final wash |
Flank, brisket, rump | Sponging |
| Hide-on carcasses | 1/300 carcasses or 1/week – whichever is greater | Chilled carcasses | Inside flank, inside brisket, inside rump | Sponging |
| Equines | 1/300 carcasses or 1/week – whichever is greater | Chilled carcasses Hot boned: after final wash |
Flank, brisket, rump | Sponging |
| Ratites | 1/300 carcasses or 1/week – whichever is greater | Chilled carcasses Hot boned: after final wash |
Sponge back and thigh | Sponging |
Addendum 2 – Specific sample collection procedures for livestock and ratites
The establishment's sample collection procedures must be clearly described in the operator's program. The following procedures are taken from the reference Guidelines published by the FSIS (PDF 512 kb). Establishments which do sampling of E. coli on beef and hogs must use either the excision or carcass sponging technique described in this section. Operators which do sampling of E. coli on sheep, goats and equine must use the carcass sponging technique described in this section and for ratites develop a sample collection based on guidelines provided in this section.
Other sample collection procedures (for example, excision of samples instead of swabbing) may be acceptable provided they have been assessed by CFIA and found satisfactory. Establishments wishing to use alternative sampling methods should forward their proposal to the Center of Operational Guidance and Expertise (COGE) - Food Import-Export that will transmit it to Food Import Export Division (FIED).
2.1 Excision method
The "Guidelines for Escherichia coli testing for process control verification in cattle and swine slaughter establishments" (PDF 512 kb) is to be used when performance criteria outlined in section V of Part 1 are applied.
2.2 Carcass sample collection procedures (cattle, sheep, goats, equines) sponging method
Materials
- Sterile specimen sponge in sterile wire twist top-type bag or equivalent
- 25 ml sterile Butterfield's phosphate diluent (BPD)
- Sterile plastic self-sealing-type or stomacher bag
- Template for 100 cm2 sampling area (except for sheep and goats where a template of 50 cm2 is required)
- Sterile gloves
- Wheeled ladder, sampling platform, or step ladder
- Sanitizing solution
- Small tote or caddy for carrying supplies
Collection
Read section on General sampling procedures.
A sampling sponge (which usually comes dehydrated and prepackaged in a sterile bag) will be used to sample all 3 sites on the carcass (flank, brisket, and rump- see figures 34 and 36 of Addendum 3). It is important to swab the areas in the order of least to most contamination in order to avoid spreading any contamination. Therefore, swab the areas in the sequence indicated in this sampling protocol.
Non-destructive surface sampling will be conducted as follows (see also Addendum 3 procedure 3 "How to sponge a beef carcass" (Attachment 6 to FSIS Directive 10,250.1 (PDF 5,087 kb)).
- ensure that all bags have been pre-labelled and all supplies are on hand, including the sampling template (An assistant may be helpful during the sampling process.)
- if a reusable template is used, immerse the sampling template in an approved sanitizing solution for at least 1-2 minutes. Just prior to swabbing the first sample site on the carcass (step 13), retrieve the sampling template from the sanitizing solution. Shake excess solution from the utensil, then protect the portion of the template that will contact the carcass from contamination
- locate the flank, brisket, and rump sampling sites using illustrations and directions in figure 34 (cattle carcass sampling locations)
- position the wheeled ladder, sampling platform, or step ladder near the carcass so the rump sample area (figure 34) is within easy reach from the ladder
- while holding the sponge bag at the top corner by the wire closure, tear off the clear, perforated strip at the top of the bag
- remove the cap from sterile BPD bottle, being careful not to touch the bottle opening
- carefully pour about half the contents of the sterile BPD bottle (approximately 10 ml) into the sponge bag to moisten the sponge
- close the top of the bag by pressing the wire closures together. Use hand pressure from the outside of the bag and carefully massage the sponge until it is fully hydrated (moistened)
- with the bag still closed, carefully push the moistened sponge to the upper portion of the bag orienting 1 narrow end of the sponge up toward the opening of the bag. Do not open the bag or touch the sponge with your fingers. While holding the bag, gently squeeze any excess fluid from the sponge using hand pressure from the outside. The whole sponge should still be in the bag
- open the bag containing the sponge, being careful not to touch the inner surface of the bag with your fingers. The wire closure at the top of the bag should keep the bag open. Set bag aside
- put on a pair of sterile gloves (see also Addendum 3 procedure 1 "How to put on sterile gloves")
- carefully remove the moistened sponge from the bag with the thumb and fingers (index and middle) of your sampling hand
- with the other hand, retrieve the template by the outer edge, taking care not to contaminate the inner edges of the sampling area of the template
- locate the flank sampling area (figure 34). Place the template over this location
- hold the template in place with 1 gloved hand (Remember, only the sponge should touch the sampling area. Take care not to contaminate this area with your hands)
- with the other hand, wipe the sponge over the enclosed sampling area (10 cm x 10 cm) for a total of approximately 10 times in the vertical and 10 times in the horizontal directions. The pressure for swabbing would be as if you were removing dried blood from the carcass. However, the pressure should not be too hard as to crumble or destroy the sponge. (Note: The template may need to be "rolled" from side to side during swabbing since the surface of the carcass is not flat. This ensures that the 100 cm2 area is enclosed while swabbing.)
- repeat steps 14-16 for the brisket area, using the same side or surface of the sponge used to swab the flank area
- after swabbing the brisket area, transfer the template to the same hand holding the sponge. Do not contaminate the sponge or inner edges of the sampling area of the template
- climb the ladder or platform, holding onto the handrail with the hand used to hold the template. Once at a convenient and safe height for sampling the rump, transfer template back to "climbing" hand (hand used to hold onto the rail while climbing the ladder), taking care not to contaminate the inner edges of the template
- repeat steps 14-16 for the rump area, using the "clean" surface or side (the side that was not previously used to swab the flank/brisket areas) of the sponge
- after swabbing the rump area, carefully place the sponge back in the sponge sample bag, taking care not to touch the sponge to the outside of the sample bag
- while holding the handrail, climb down from the ladder
- add the additional BPD (about 15 ml) to the sample bag to bring the total volume to approximately 25 ml
- expel excess air from the bag containing the sponge and fold down the top edge of the bag 3 or 4 times to close. Secure the bag by folding the attached wire tie back against the bag. Place closed sponge bag into second bag and close the second bag securely
-
- If samples are to be analyzed at an on-site laboratory, begin sample preparation
- If samples are to be analyzed at an outside (off-site) laboratory, follow shipping procedures
- results must be analyzed using the performance criteria specific to the establishments as established through the use of statistical process control technique. The moving window and pre-set ("m") and ("M") criteria cannot be used
2.3 Carcass sample collection procedures sponging method (swine)
Carcass sponging method - swine
Materials
- sterile specimen sponge in sterile wire twist top type-bag or equivalent
- 25 ml sterile Butterfield's phosphate diluent (BPD)
- sterile plastic self-sealing-type bag or stomacher-type bag
- template for a 100 cm2 sampling area
- sterile gloves
- wheeled ladder, sampling platform, or step ladder
- sanitizing solution
- small tote or caddy for carrying supplies
Collection
Read section III of Part 1 on General sampling policies.
A sampling sponge (which usually comes dehydrated and prepackaged in a sterile bag) will be used to sample all 3 sites on the swine carcass (belly, ham, and jowl - see figures 37 and 38 to Addendum 3). It is important to swab the areas in the order of least to most contamination in order to avoid spreading any contamination. Therefore, swab the areas in the sequence indicated in this sampling protocol. Non-destructive surface sampling will be conducted as follows (see also Addendum 3 procedure 4 "How to sponge a swine carcass") (Attachment 7 to FSIS Directive 10,250.1 (PDF 5,087 kb)).
- ensure that all supplies are on hand (An assistant may be helpful during the sampling process.)
- if a reusable template is used, immerse the sampling template in a sanitizing solution for at least 1-2 minutes. Just prior to swabbing the first sample site on the swine carcass (step 12), retrieve the sampling template from the sanitizing solution. Shake excess solution from the utensil, then protect the portion of the template that will contact the carcass from contamination
- locate the belly, ham, and jowl sampling sites using illustrations and directions in figures 37 and 38 (swine carcass sampling locations)
- position the wheeled ladder, sampling platform, or step ladder near the carcass so the ham sample area (figures 37 and 38) is within easy reach from the ladder
- hold the sponge bag at the top corner by the wire closure, then tear off the clear perforated strip at the top of the bag. Open the bag
- remove the cap from sterile BPD bottle, being careful not to touch the bottle opening. Do not contaminate the lid
- carefully pour about half of the contents of the sterile BPD bottle (10 ml) into the sponge bag to moisten the sponge. Put the lid back on the BPD bottle
- close the top of the bag by pressing the wire closures together. Use hand pressure from the outside of the bag and carefully massage the sponge until it is fully hydrated (moistened)
- with the bag still closed, carefully push the moistened sponge to the upper portion of the bag orienting 1 narrow end of the sponge up toward the opening of the bag. Do not open the bag or touch the sponge with your fingers. While holding the bag, gently squeeze any excess fluid from the sponge using hand pressure from outside. The whole sponge should still be inside the bag
- open the bag containing the sponge, being careful not to touch the inner surface of the bag with your fingers. The wire closure at the top of the bag should keep the bag open
- put on a pair of sterile gloves (see also Addendum 3 procedure 1 "How to put on sterile glove") Attachment 1 to FSIS Directive 10,250.1
- carefully remove the moistened sponge from the bag with the thumb and fingers (index and middle) of your sampling hand
- with the other hand, retrieve the template by the outer edge, taking care not to contaminate the inner edges of the sampling area of the template
- locate the belly sampling area (Figures 37 and 38). Place the template over this location
- hold the template in place with 1 gloved hand. Remember, only the sponge should touch the sampling area. Take care not to contaminate this area with your hands
- with the other hand, wipe the sponge over the enclosed sampling area (10 cm x 10 cm) for a total of approximately 10 times in the vertical and 10 times in the horizontal directions. The pressure for swabbing would be as if you were removing dried blood from the carcass. However, the pressure should not be too hard as to crumble or destroy the sponge
Note: The template may need to be "rolled" from side to side during swabbing since the surface of the carcass is not flat. This ensures that the 100 cm2 area is enclosed while swabbing. - after swabbing the belly area, transfer the template to the same hand that is holding the sponge. Do not contaminate the sponge or the inner edges of the sampling area of the template
- climb the ladder or platform, holding onto the handrail with the hand used to hold the sampling template in place. Once at a convenient and safe height for sampling the ham, transfer template back to the "climbing" hand (hand used to hold onto the rail while climbing the ladder), taking care not to contaminate the sponge or the inner edges of the template
- repeat steps 14-16 for the ham sampling area, using the same surface of the sponge used to swab the belly area
- after swabbing the ham area, carefully place the template back to the same hand that is holding the sponge. Do not contaminate the sponge or the inner edges of the sampling area of the template
- while holding the handrail, climb down from the ladder
- transfer the template back to the "climbing" hand (hand used to hold onto the rail while descending the ladder), taking care not to contaminate the sponge or the inner edges of the template
- repeat steps 14-16 for the jowl area, using the "clean" surface or side (the side that was not previously used to swab the belly/ham areas)
- after swabbing the jowl area, carefully place the sponge back into the sponge bag. Do not touch the surface of the sponge to the outside of the sponge bag
- add the additional BPD (about 15 ml) to the bag to bring the total volume to approximately 25 ml
- press wire closures of the sponge bag together, expel excess air, then fold down the top edge of the bag 3 or 4 times. Secure the bag by folding the attached wire tie back against the bag. Place the closed sponge bag into the second bag and close the second bag securely
-
- if samples are to be analyzed at an on-site laboratory, begin sample preparation
- if samples are to be analyzed at an outside (off-site) laboratory, follow shipping procedures
- results must be analyzed using establishment specific statistical process control - the moving window and pre-set ("m") and ("M") criteria cannot be used
Addendum 3 – This is a technical information provided for information purposes in case of sampling a microorganism.
This technical information was taken from original FSIS directive 10,250.1
Food Safety and Inspection Service sampling procedures guidelines for microorganism.
- 3.1 How to put on sterile gloves
- 3.2 How to prepare the sponge and template for sample collectionM
- 3.3 How to sponge a beef carcass
- 3.4 How to sponge a swine carcass
3.1 How to put on sterile gloves
Step 1
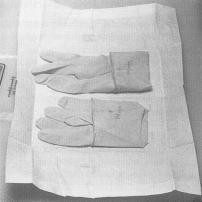
First, wash and sanitize your hands to the mid- forearm. Dry your hands using disposable paper towels.
Position the glove package so that the letters L and R face you (L = left, R = right)
Step 2
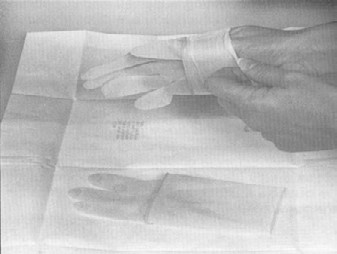
When you first open the package, the gloves are folded, forming a cuff on the sleeve, and lying palm up. Leave the gloves in the package until you start to put them on.
Step 3
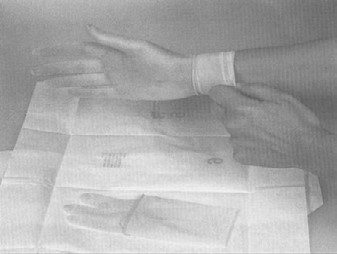
Hold 1 glove open by the inside cuff area. Insert your hand into the glove, palm side up, and remove the glove from the package.
Step 4
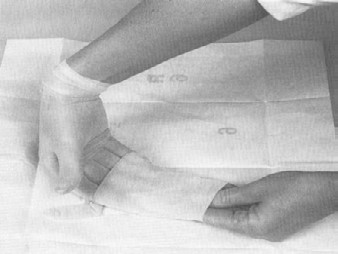
Pull the glove completely on with the ungloved hand and pull the cuff up without touching the outside surface of the glove with your ungloved hand.
Step 5

Repeat the previous steps with the other glove, with 1 key exception: do not handle the second glove by the inside cuff. If you do, the outside of the first sterile glove may contact your hand and wrist as you pull the second glove on. Even though you washed and sanitized your hands, they are not sterile. The correct way is to place your ungloved hand, palm up, into the second glove.
Insert the fingers of your gloved hand into the fold of the second cuff and ease the second glove on.
Step 6

Handle the second glove on the outside only and adjust the cuff on your wrist.
Step 7
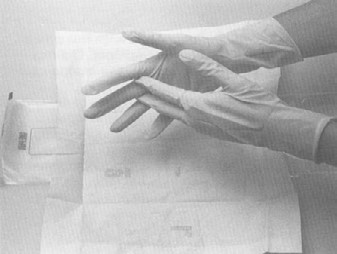
Once both gloves are on, you can touch the outside of a glove with the other gloved hand to adjust the fit.
If at any time you are concerned that a glove may have become contaminated, discard it and repeat the procedure for putting on sterile gloves.
3.2 How to prepare the sponge and template for sample collection
Step 1
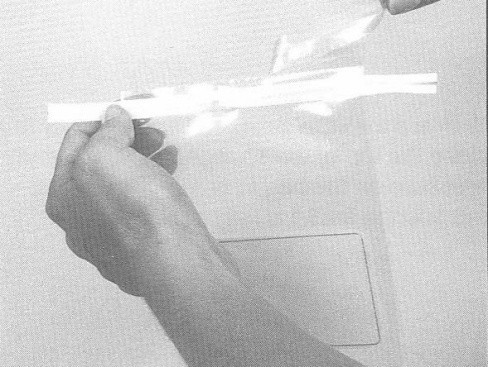
These steps are to be performed immediately prior to performing the sponge sample collection.
Wash and dry hands.
Retrieve the container of BPW from the refrigerator.
Step 2
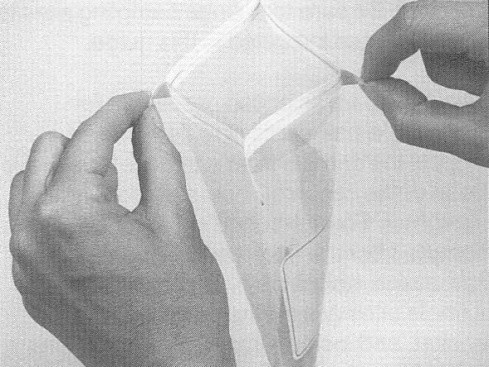
Open the sponge bag by holding it at 1 corner by the wire closure (usually colored white or yellow). Tear off the clear perforated strip at the top of the bag. Do not remove or tear off the wire closures.
Pull apart the 2 small white tabs on either side of the bag to open the mouth of the bag.
Step 3
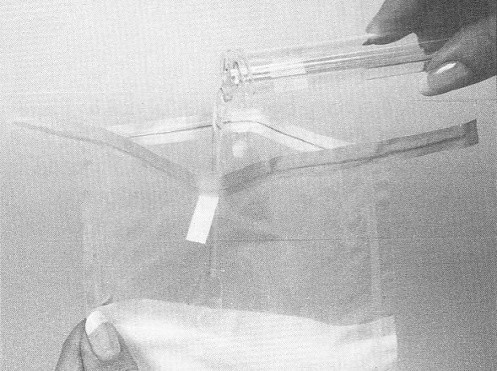
Remove the cap from the pre-chilled sterile BPW container, being careful not to touch the container opening.
Carefully pour the entire contents of the BPW container (10 ml) into the sponge bag to moisten the sponge. Set the container aside.
Step 4
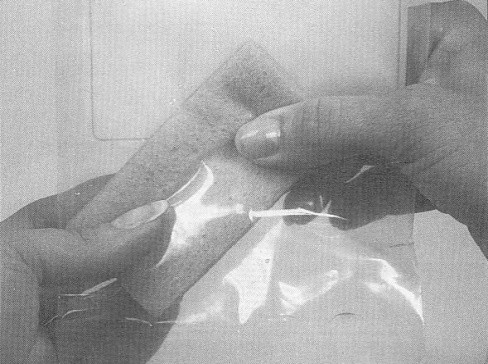
Press the wire closures back together to close the top of the sponge bag.
Use hand pressure on the bag to carefully massage the sponge until it is fully moistened.
Step 5
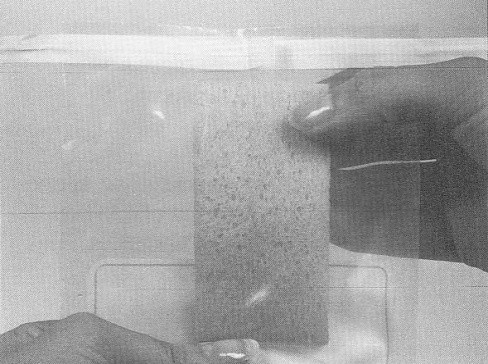
With the bag still closed, carefully push the moistened sponge to the upper portion of the bag.
Position 1 width end of the sponge toward the opening.
Step 6
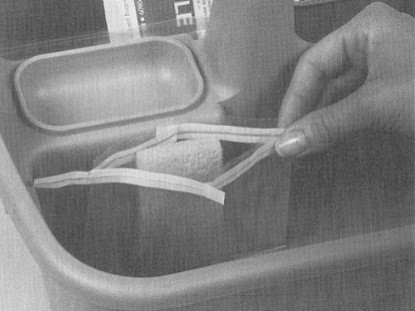
Open the bag, being careful not to touch the inner surface with your fingers. The wire closure at the top of the bag should keep the bag open.
Set the bag aside, being careful not to contaminate the sponge.
Step 7
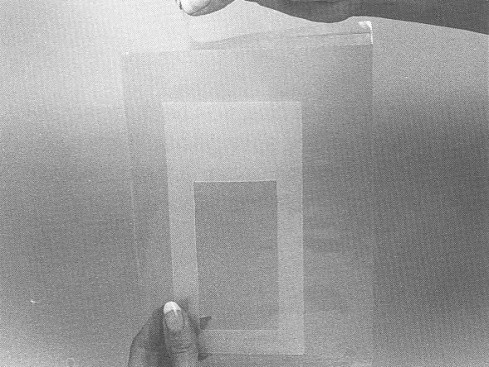
Open the template bag by holding the bag at 1 corner and tear off the clear, perforated strip at the top of the bag.
Set the bag aside, being careful not to contaminate the template.
Step 8
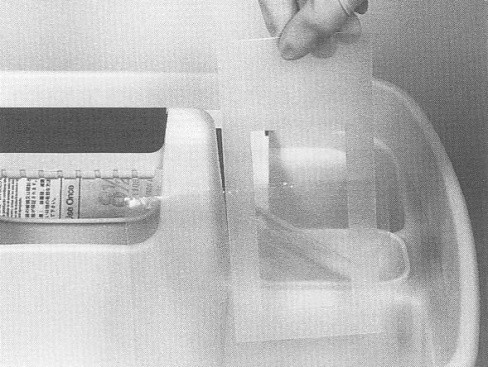
Put on a pair of sterile gloves as described in procedure 1 – how to put on sterile gloves.
Carefully remove the moistened sponge from the bag by grasping the end of the sampling sponge with your gloved sampling hand. Do not touch the outside of the bag.
With your other gloved hand, retrieve the template by its outer edge, taking care not to contaminate the inner edges that define the template's sampling areas.
Perform the sponge sample collection for the specified species.
3.3 How to sponge a beef carcass
Purpose of this procedure
The methodology is provided here for use in special projects or other instances where it may be required.
Preparing to collect a sample
- select a time at which to collect the sample. Determine the times that carcasses chilled for 12 hours or more will be on hand. Then randomly select a time from within that time frame for collecting the samples.
- select the cooler site from which to collect the sample. Select a safe and accessible site in the cooler for collecting samples from a beef half-carcass. This site may be located at the transfer chain, grading chain, a rail, or other safe, uncrowded location in the cooler.
- use aseptic techniques as outlined in chapter III, section 3 of part I
- wash and sanitize hands
- sanitize work surfaces (surfaces that will contact supplies while they are being gathered)
- gather the supplies
- label the sponge bag
- wash and sanitize hands
- take supplies to the sampling location
- sanitize work surfaces (surfaces that will contact supplies during sampling)
- lay absorbent towels or sanitized rack on work surface to prevent the carcass from slipping
Collecting the sample (sponge sample)
- at the random time selected, go to the sampling location. Do not choose the carcass that is at the predetermined location. Instead, count back or ahead 5 sample units and choose the 6th unit to sample. (The reason for counting back or ahead 5 half-carcasses is to avoid any possible bias during selection.) Normally it should not be necessary to have the establishment move many half- carcasses to access a random 1 to sample
- sponge the carcass and prepare the sample for shipping (follow the general sponging techniques as outlined in Procedure 2 – how to prepare the sponge and template for sample collection; and Procedure 3 – how to sponge a carcass (General)):
- position equipment (keep safety in mind)
- locate the areas of the carcass for sampling
- layout supplies
- open the sponge bag
- pour BPW into the sponge bag
- close the bag and massage the sponge
- push the sponge to the top of the bag, open it, and set it aside on a sanitized surface
- open the template bag and set it aside on a sanitized surface
- put on the sterile gloves (see Procedure 1 – How to put on sterile gloves)
- remove the sponge
- remove the template
- lay the template over the flank. Do not touch the sampling area
- hold the template with 1 gloved hand and use the other hand to wipe the area with the sponge
- do 10 vertical wipes over the entire sample surface; then do 10 horizontal wipes over the entire sample surface
- lay the template over the brisket. Do not touch the sampling area
- hold the template with 1 gloved hand and use the other hand to wipe the area with the sponge
- do 10 vertical wipes over the entire sample surface; then do 10 horizontal wipes over the entire sample surface
- carefully climb to sample the rump without touching the template or sponge to any area not being sampled
- lay the template over the rump. Do not touch the sampling area
- hold the template with 1 gloved hand and use the other hand to wipe the area with the sponge
- do 10 vertical wipes over the entire sample surface; then do 10 horizontal wipes over the entire sample surface
- place the sponge in the Whirl-Pak® bag and seal the bag
- the sample is now complete. Follow the storage and shipping instructions in Chapter VI – Submitting the collected sample
Sample Sites for testing of beef carcasses
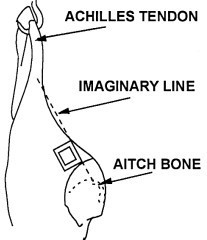
Rump
Locate the posterior aspect of the ischium or aitch bone. Draw an imaginary line toward the Achilles tendon. At the point where the line intersects the cut surface of the round is the starting point for the rump sample.
Place the template over this area of the rump.
Note: This illustration has been purposely altered: a true lateral view of the carcass would not show the aitch bone. From a medial view, the whole 10 cm x 10 cm sample area could not be seen. Therefore, a lateral view with a portion of the round removed is shown to illustrate the location of the aitch bone.
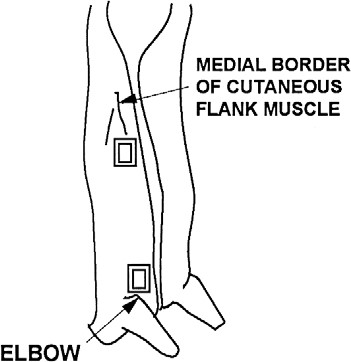
Flank
Locate the cutaneous flank muscle (external abdominal oblique) and follow the medial border of the muscle anteriorly until it comes within approximately 3" of the midline.
This will be where to place the template.
Brisket
Locate the elbow of the carcass. Draw an imaginary line straight across (medially) to the midline cut.
This will be where to place the template.
IV Beef carcass sponge sampling technique
Step 1
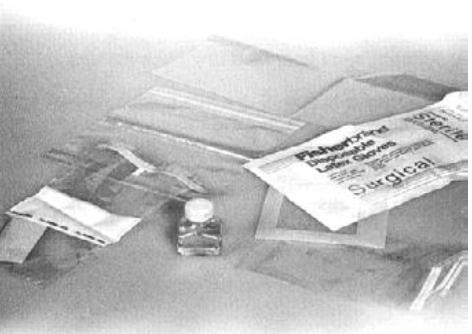
Sampling supplies included in shipping container:
- 1 - Sterile specimen sponge in Whirl-Pak® bag 1 - 10 ml sterile pre-chilled BPW
- 1 - Sterile template in bag 1 – pair sterile gloves
- 1 – 6" x 12" plastic sleeve for completed sample form
- 1 – FSIS Form 7355-2A/2B laboratory sample security seal set
- 3 – FedEx preprinted billable stamps (1 for each FSIS laboratory)
- 1 – Absorbent pad
- 1 – Foam plug per shipping container Cardboard separators
- Gel coolant packs
Ensure that all sample supplies are on hand. Use a small tote or caddy for carrying supplies to the sampling location.
Sanitize the work surface.
Wash and dry hands.
Also, refer to Procedure 3 - How to sponge a carcass (General).
Put on a pair of sterile gloves as described in Procedure 1 – How to put on sterile gloves.
Step 2

Carefully remove the moistened sponge from the bag by grasping the end of the sampling sponge with your gloved sampling hand. Do not touch the outside of the bag.
With your other gloved hand, retrieve the template by its outer edge, taking care not to contaminate the inner edges that define the template's sampling areas.
Place the template over the flank sampling area and hold it in place. Be careful not to contaminate the enclosed sampling area with your hands.
Step 3
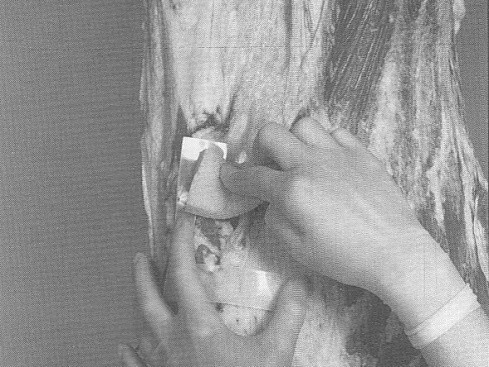
With the sampling hand, wipe the sponge over the entire enclosed area (5 cm x 10 cm) approximately 10 times vertically and 10 times horizontally. Use only 1 side of the sponge.
Note: the template may need to be "rolled" from side to side as the sponging is performed since the surface of the carcass is not flat. This will ensure that the full 100 cm2 area is sampled during the sponging.
Step 4
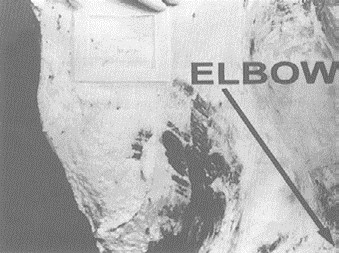
Repeat steps 2 and 3 for the brisket area, using the same surface of the sponge that you used to wipe the flank sampling area.
Step 5

Repeat steps 2 and 3 for the rump area, this time using the "clean" side of the sponge (the side that was not used to wipe the flank and brisket areas). After sponging the rump area, transfer the template back to the sampling hand. Be careful not to contaminate the sponge.
Climb down from the ladder while holding the handrail with your "climbing" hand. Lay the template aside to discard later.
3.4 How to sponge a swine carcass
Purpose of this procedure
Routine verification of swine (Market hogs) carcasses has been suspended. The methodology is provided here for use in special projects or other instances where it may be required
Preparing to collect a sample
- Select a time at which to collect the sample. Determine the times that carcasses chilled for 12 hours or more will be on hand. Then randomly select a time from within that time frame for collecting the samples
- Select the cooler site from which to collect the sample. Select a safe and accessible site in the cooler for collecting samples from a swine carcass. This site may be located at the transfer chain, grading chain, a rail, or other safe, uncrowded location in the cooler
- Use aseptic techniques as outlined in Chapter II, Section I.A.2
- wash and sanitize hands
- sanitize work surfaces (surfaces that will contact supplies while they are being gathered)
- gather the supplies
- label the sponge bag
- wash and sanitize hands
- take supplies to the sampling location
- sanitize work surfaces (surfaces that will contact supplies during sampling)
Collecting the sample (Sponge sample)
- at the random time selected, go to the sampling location. Do not choose the carcass that is at the predetermined location. Instead, count back or ahead 5 sample units and choose the 6th unit to sample. Counting back or ahead 5 carcasses avoids any possible bias during selection. Normally it should not be necessary to have the establishment move many carcasses to access a random 1 to sample.
Swine carcasses that are routinely partially skinned may be used.
- sponge the carcass and prepare the sample for shipping (follow the general sponging techniques as outlined in Procedure 2 – how to prepare the sponge and template for sample collection; and Procedure 3 – how to sponge a carcass (General)):
- position equipment (keep safety in mind)
- locate the areas of the carcass for sampling (see sample sites for testing of swine carcasses)
- layout supplies
- open the sponge bag
- pour BPW into the sponge bag
- close the bag and massage the sponge
- push the sponge to the top of the bag, open it, and set it aside on a sanitized surface
- open the template bag and set it aside on a sanitized surface
- put on the sterile gloves (see Procedure 1 – How to put on sterile gloves)
- remove the sponge
- remove the template
- lay the template over the belly (see Sample Sites for Testing of Swine Carcasses). Do not touch the sampling area
- hold the template with 1 gloved hand and use the other hand to wipe the area with the sponge
- do 10 vertical wipes over the entire sample surface; then do 10 horizontal wipes over the entire sample surface
- carefully climb to sample the ham without touching the template or sponge to any area not being sampled
- lay the template over the ham (see Sample Sites for Testing of Swine Carcasses). Do not touch the sampling area
- hold the template with 1 gloved hand and use the other hand to wipe the area with the sponge
- do 10 vertical wipes over the entire sample surface; then do 10 horizontal wipes over the entire sample surface
- carefully climb down to sample the jowl without touching the template or sponge to any area not being sampled
- lay the template over the jowl (see Sample Sites for Testing of Swine Carcasses). Do not touch the sampling area
- hold the template with 1 gloved hand and use the other hand to wipe the area with the sponge
- do 10 vertical wipes over the entire sample surface; then do 10 horizontal wipes over the entire sample surface
- place the sponge in the Whirl-Pak® bag and seal the bag
- the sample is now complete. Follow the storage and shipping instructions in Chapter VI – Submitting the collected sample
Sample sites for testing of swine carcasses
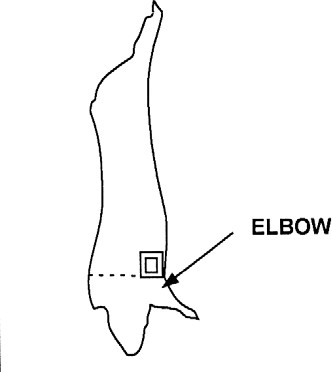
Belly
Locate the elbow of the carcass.
Place the template over this area (armpit) of the belly.
Jowl
Draw an imaginary line from the atlas/axis joint to the ventral midline; all skin below that point will be considered the jowl.
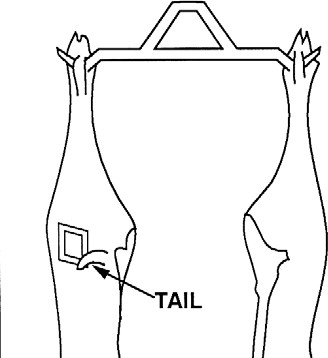
Ham
From the dorsal position, locate the lateral surface of the base of the tail.
Place the template over this area of the ham. Do not include the base of the tail.
Swine carcass sponge sampling technique
Step 1

Materials:
- 1 - Sterile specimen sponge in Whirl-Pak® bag
- 1 - 10 ml sterile pre-chilled BPW
- 1 - Sterile template in bag 1 – pair Sterile gloves
- 1 – 6" x 12" plastic sleeve for completed sample form
- 1 – FSIS Form 7355-2A/2B Laboratory sample security seal set
- 3 – FedEx preprinted billable stamps (one for each FSIS laboratory)
- 1 – Absorbent pad
- 1 – Foam plug per shipping container Cardboard separators
- Gel coolant packs
Ensure that all sample supplies are on hand. Use a small tote or caddy for carrying supplies to the sampling location.
Sanitize the work surface.
Wash and dry hands.
Also, refer to Procedure 3 - how to sponge a carcass (General).
Put on a pair of sterile gloves as described in Procedure 1 – how to put on sterile gloves.
Step 2
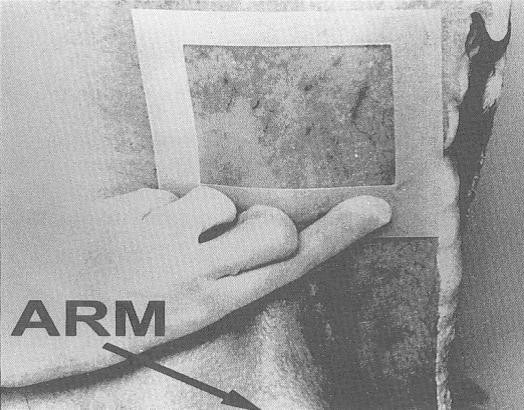
Place the template over the belly sampling area and hold it in place. Be careful not to contaminate the enclosed sampling area with your hands.
Step 3
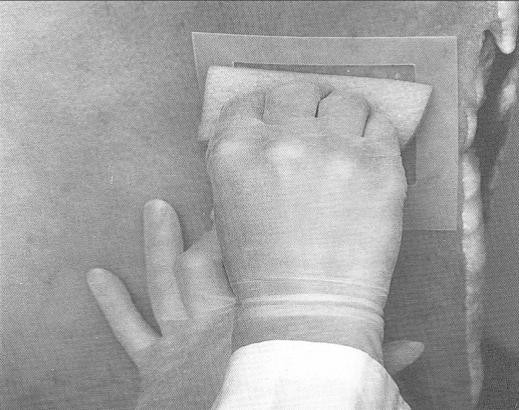
With the sampling hand, wipe the sponge over the entire enclosed area (5 cm x 10 cm) approximately 10 times vertically and 10 times horizontally. Use only 1 side of the sponge.
Note: The template may need to be "rolled" from side to side as the sponging is performed since the surface of the carcass is not flat. This will ensure that the full 100 cm2 area is sampled during the sponging.
After sponging the belly area, transfer the template to your sampling hand. Be careful not to contaminate the inner edges of the template's sampling area. Climb the ladder or platform, holding on to the handrail with the hand not used to perform sponging. This glove is now contaminated and must be treated as such, so do not handle any sterile surfaces with it.
Step 4
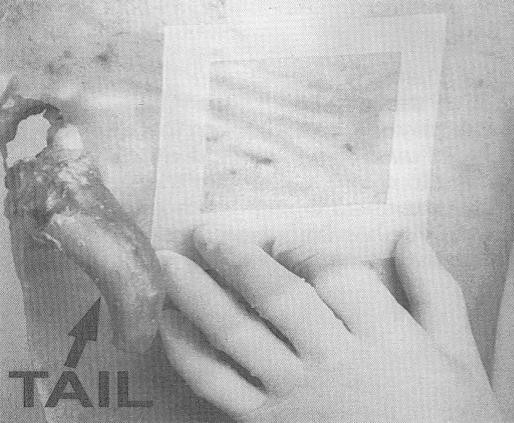
Once you are at a convenient and safe height for sampling the ham, transfer the template back to your "climbing" hand, taking care not to contaminate the inner edges of the template's sampling area or your sampling hand.
Repeat steps 2 and 3 for the ham area, using the same surface of the sponge that you used to wipe the belly area.
After sponging the ham area, carefully transfer the template back to the hand holding the sponge (sampling hand). Do not contaminate the inner edges of the templates sampling area. Be careful not to contaminate the sponge.
Climb down from the ladder while holding the handrail with your "climbing" hand.
Step 5
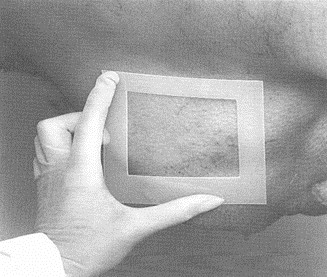
Transfer the template from your sampling hand back to your other hand, taking care not to contaminate the template's inner edges.
Repeat steps 2 and 3 for the jowl area, this time using the "clean" side of the sponge (the side that was not used to wipe the belly and ham areas).
Lay the template aside to discard later.
Step 6
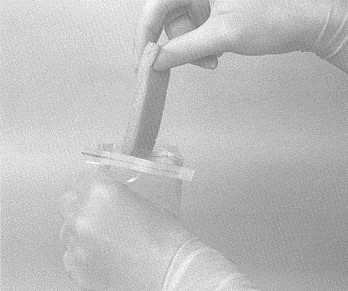
Place the sponge in the sample bag. Be careful not to touch the outside of the bag with the sponge.
Step 7
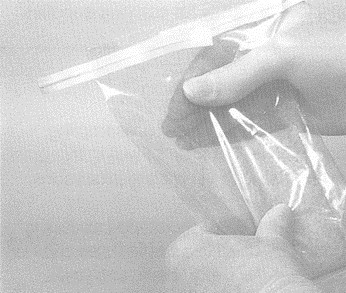
Expel any excess air from the sample bag and fold over the top edge of the bag 3 or 4 times to close it.
Step 8
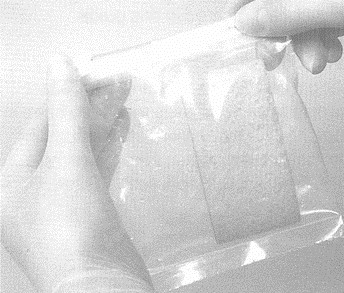
Do not double-bag the sample. Discard the template. Collected samples are to be refrigerated within 5 minutes of collection and held under refrigeration and FSIS control until shipment to the laboratory. Repeat these steps above for each sample request. Use a different carcass for each sample.
Addendum 4 – Figures and illustrations
4.1 Example of a sampling template
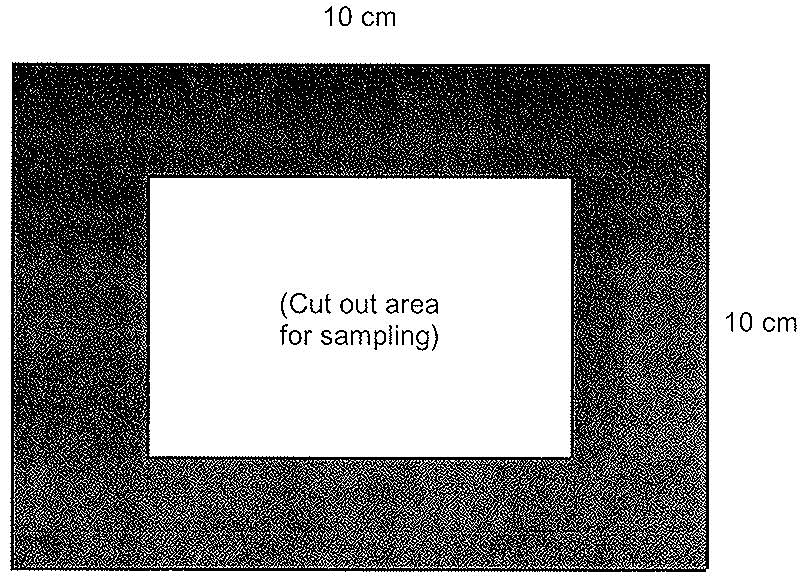
Beef and pork carcasses = 10 x 10 cm
4.2 Sampling site for E. coli testing of cattle, sheep, goats and equines
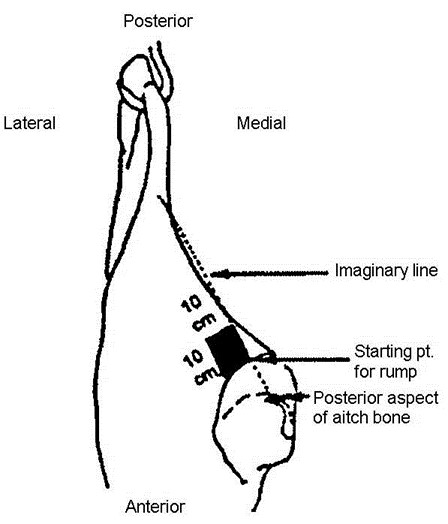
Rump
Locate the posterior aspect of the aitch bone. Draw an imaginary line toward the Achilles tendon. The point where the line intersects the cut surface of the round is the starting point for the rump sample.
Measure 10 cm up from the line leading to the Achilles tendon, then 10 cm over (laterally), then 10 cm back to the cut surface of the round, then 10 cm along the cut surface to form the 10 cm by 10 cm square area.
Note: the upper illustration has been purposely altered somewhat. A true lateral view of the carcass would not show the aitch bone. From a medial view, the whole 10 10 x $2 cm sampling area could not be seen. Therefore, a lateral view with a portion of the round removed so the location of the aitch bone is shown is illustrated.
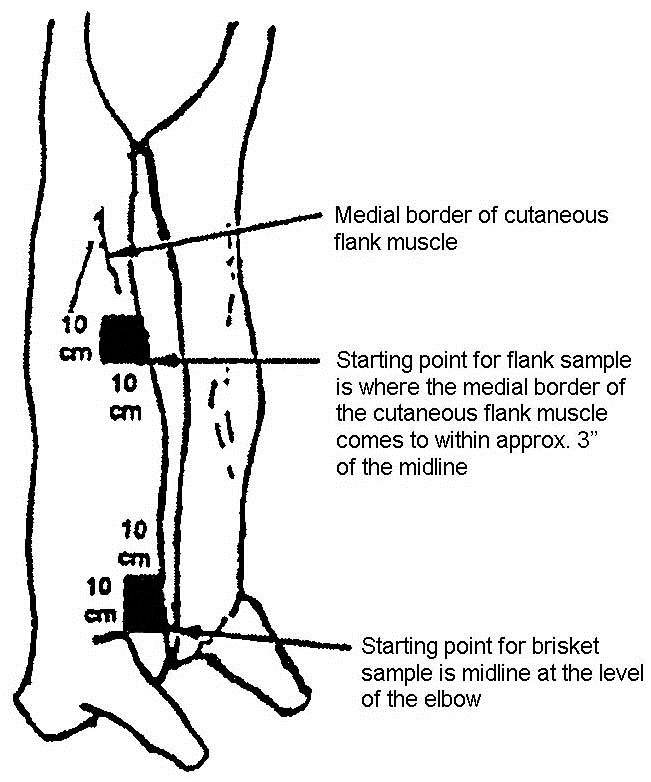
Flank
Locate the cutaneous flank muscle (external abdominal oblique) and follow the medial border of the muscle anteriorly until it comes to approximately 3" of the midline. This will be the starting point. Measure up (posteriorly) 10 cm (approximately 4") along a line approximately 3" from the midline (measure up or parallel to the midline), then over (laterally) 10 cm (approximately 4") to form a 10 cm wide by 10 cm long square sample.
Brisket
Locate the elbow of the carcass. Draw an imaginary line straight across (medially) to the midline cut. This will be the starting point. Measure up along the midline 10 cm (approximately 4"), then over 10 cm (approximately 4") to form a 10 cm wide by 10 cm long square sample.
Note: the size of the template for sheep and goats is 5 x 10 cm.
4.3 Sampling sites (sponging) hide-on carcasses
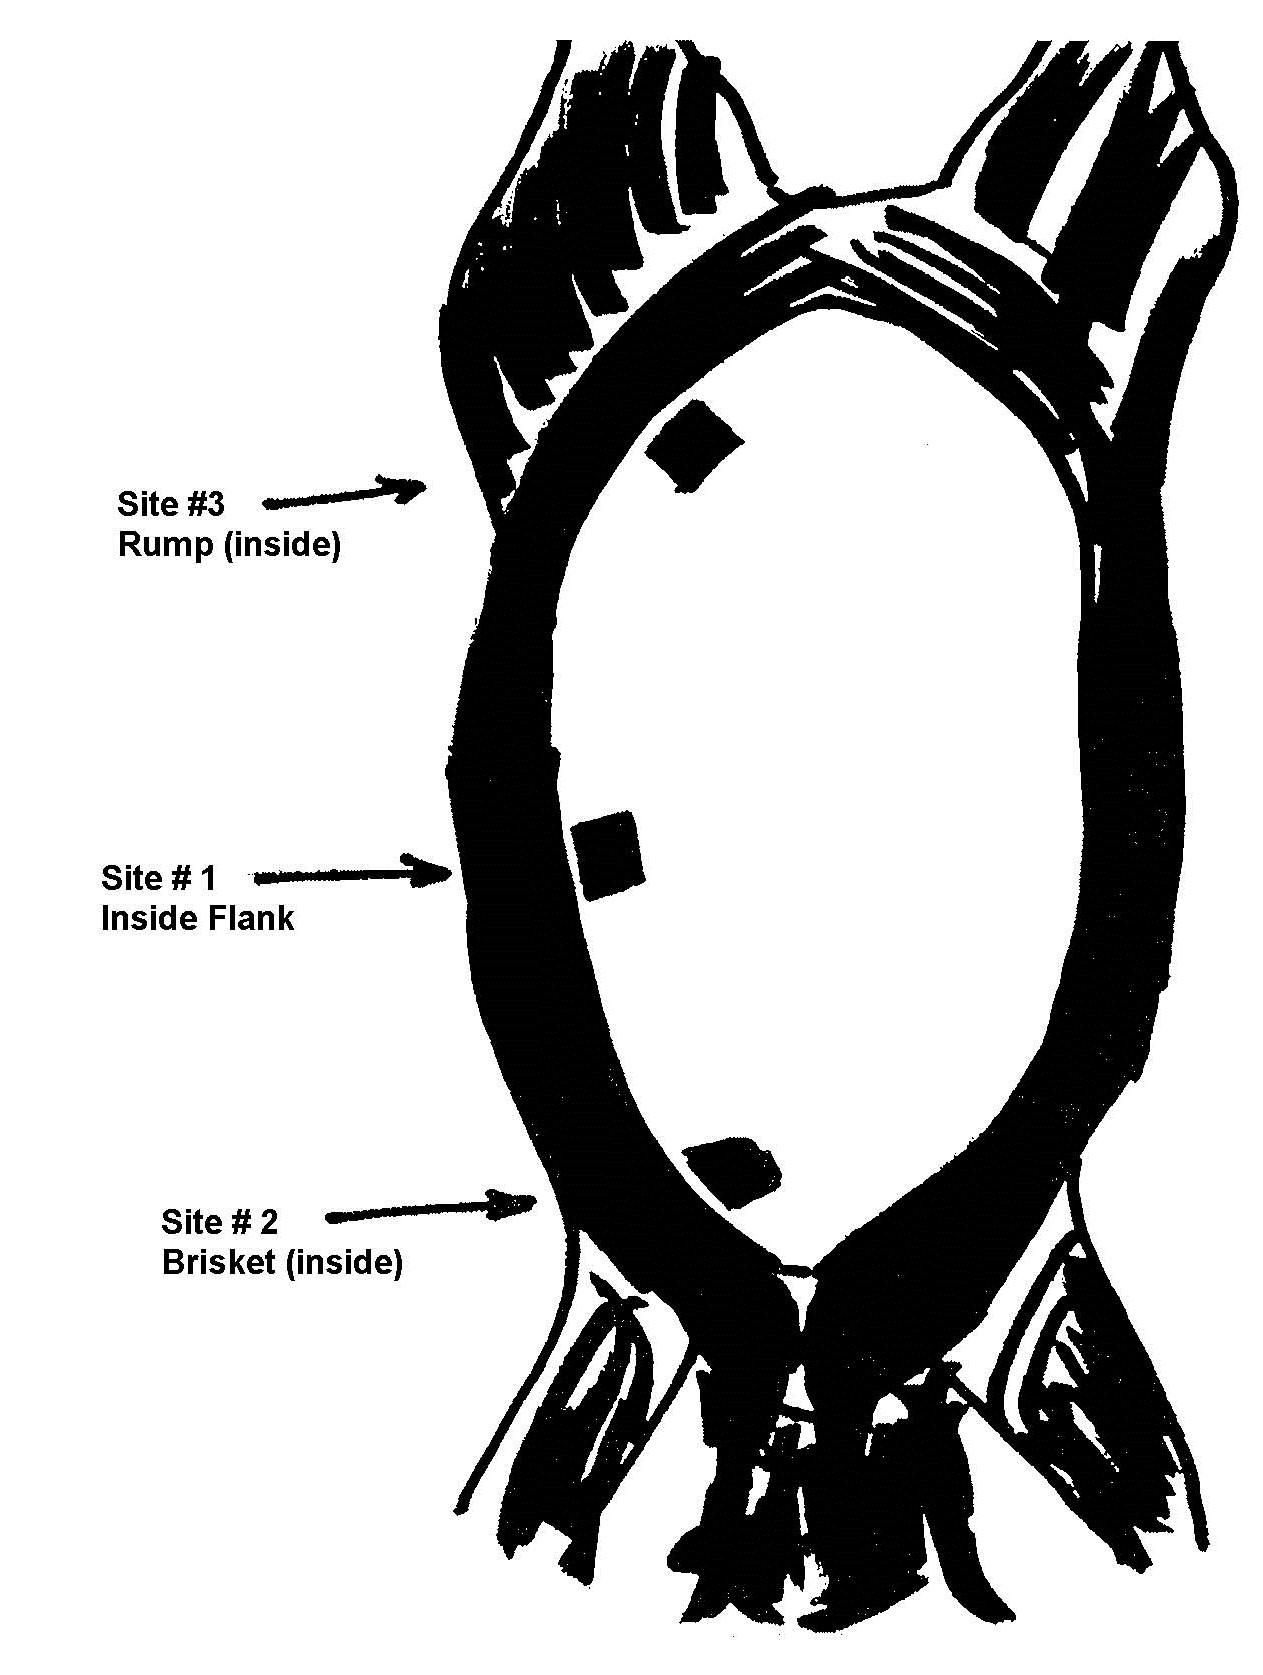
Hide-on carcasses
The sampling procedure is identical except that sampling sites are different
Hide-on veal samples shall be taken from:
- 1st sample site: inside the flank, then
- 2nd sample site: inside the brisket, and finally
- 3rd sample site: inside the rump.
4.4 Sampling sites for E. coli testing of swine carcasses
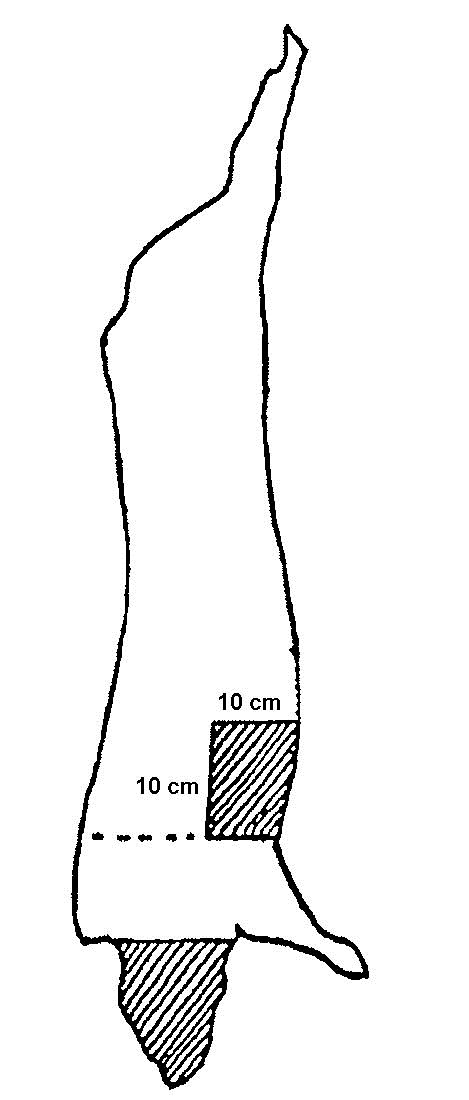
Belly
Locate the elbow of the carcass. Draw an imaginary line straight across (medially) to the midline cut. This will be the starting point. Measure up along the midline 10 cm (approximately 4"), then over 10 cm (approximately 4") to complete the 10 cm long by 10 cm wide square sample. This square area will be the 100 cm2 area to swab for the belly sample.
Jowls
Draw an imaginary line from the atlas/axis joint to the ventral/midline; all skin below that point will be considered the jowl.
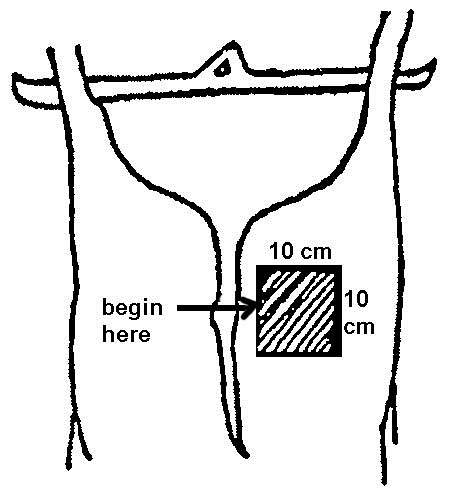
Ham
From the dorsal position, locate the lateral surface of the base of the tail, and measure up (caudal) 5 cm along the lateral edge of the exposed fat margin, then 10 cm laterally. Now measure 10 cm down (cranial), then 10 cm medially, then 5 cm up (posteriorly) to complete a 10 cm long by 5 cm wide rectangular sampling area.
4.5 Process control chart - example
E. coli (cfu/ml) - Log scale
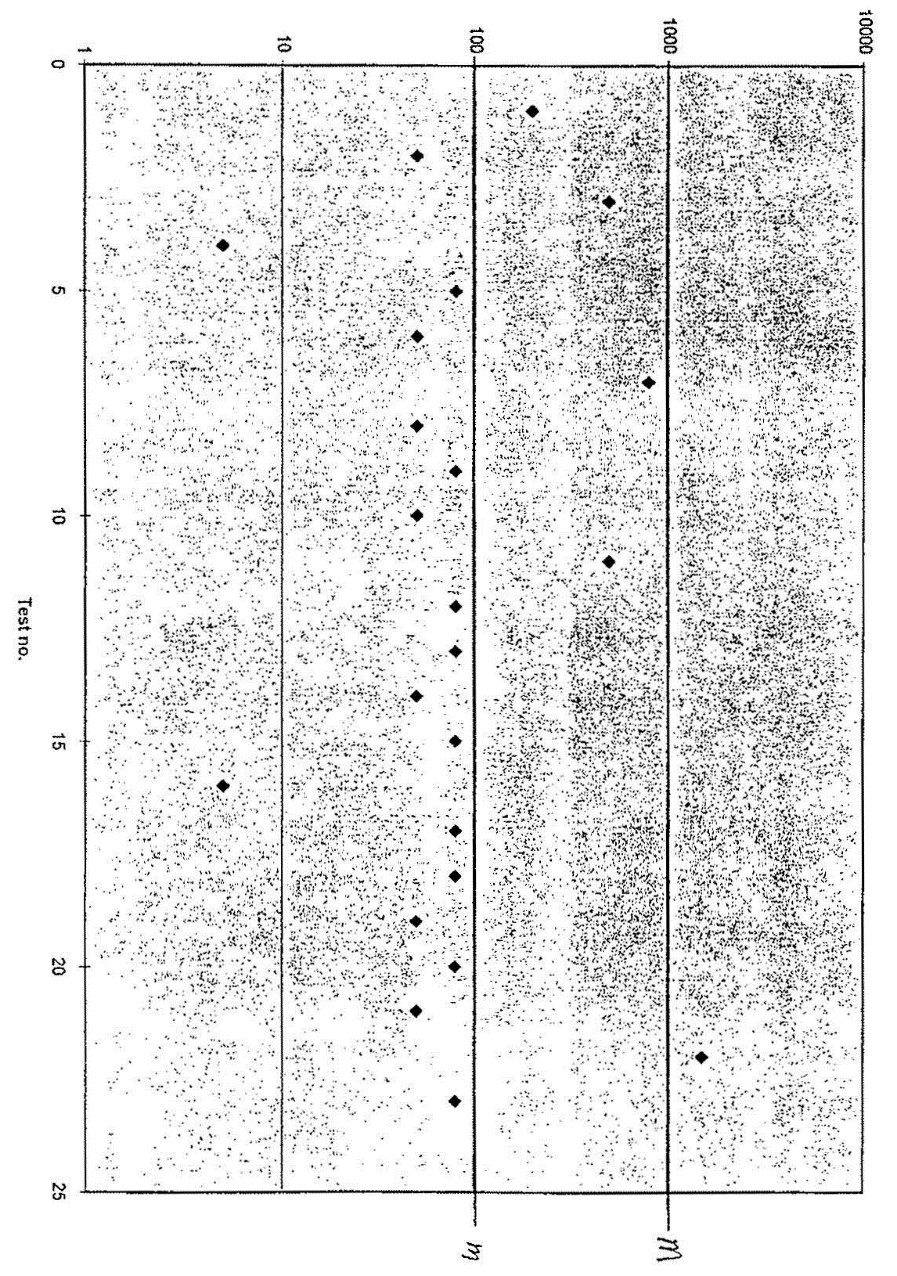
Figure 39: Process control chart – example
The numbers along the horizontal axis of the graph (x-axis) refer to the test number. The test results cfu/ml of E. coli in log scale are presented in the above chart.
More examples are provided in FSIS Guideline: Modernization of Swine Slaughter Inspection Developing Microbiological Sampling Programs in Swine Slaughter Establishments September 2019.
- Date modified: