
Flexible Retort Pouch Defects Manual - Identification and Classification
On this page
- 1.0 Introduction
- 2.0 General Information
- 3.0 Integrity Factors
- 4.0 Examination and Evaluation Process
- 5.0 Defect Severity Classification
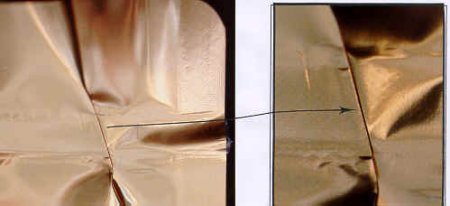
- 6.0 Alphabetical Index/Glossary
- 7.0 Defect Categories
- 8.0 Footnotes
- 9.0 Bibliography
1.0 Introduction
Container integrity is the ability of a hermetically sealed container to achieve the safe preservation of a food. Container integrity may be compromised by a wide variety of defects. These defects may arise throughout the various stages of container manufacturing, filling, sealing, processing, and handling, before the container reaches the consumer.
This document provides general information on:
- flexible pouch manufacturing (including factors on pouch integrity and thermal processing)
- examination and evaluation process
- retort pouch integrity defects and classification
- standard terminology
2.0 General Information
2.1 Background
The retort pouch is a flexible laminated food package that can withstand thermal processing. It has the advantage of offering the shelf stability of metal cans, coupled with the texture and nutrient value associated with frozen foods. The retort pouch has been considered the most significant advance in food packaging since the metal can, and has the potential to become a feasible alternative to the metal can and glass jar.Footnote 1
The U.S. Army promoted the concept of flexible retortable pouches for use in combat rations in the 1950's. The idea was to have a lightweight, easy-to-pack, shelf-stable food container in order to eliminate the heavier traditional can. Research continued through the 1960's. In 1965 the first commercial retort pouches were produced in Italy. In Japan, retort pouch technology has been widely acceptedFootnote 1 and there are many varied products on the shelf, ranging from sukiyaki to soup.
Examples of some retort pouches are shown in figure 2.1. The retort pouch has a number of advantages compared to a metal can.
- The thin profile permits a reduced heating time and thus less of a chance to overcook the product while producing better colour, firmer texture and less nutrient loss. The manufacturer has reduced energy requirements for pouch production as compared to that for metal cans.Footnote 2 The pouch (because of its thinner profile) transfers heat faster to its critical point. During processing, this permits the required amount of heat for proper sterilisation to reach the critical point with minimal overcooking of the product near the peripheral container areas. Thus, for those food commodities subject to quality loss from excessive heating during the process cycle, the flexible container offers the benefit of higher quality together with better retention of the heat-sensitive nutrients.
- The thermal process is complex due to the number of critical processing parameters which must be monitored (e.g., residual air, pouch thickness, steam/air mixture).
- Labels can be printed into the laminate, making them permanent.
- Flexible pouches are easier to distribute and therefore have lower transportation costs and require less disposal space.
- Storage space for empty flexible pouches is also reduced. A 45 ft. trailer holds 200,000 8 oz cans or 2.3 million retort pouches.
The retort pouch system has disadvantages in processing.
- The first obstacle is that processors often require a large capital investment for the unique machinery. Filling is slower and more complex compared to metal can lines.
- The thermal process (steam/air, still steam, etc.) is also more complex.
- The thermal process is complex due to the number of critical processing parameters which must be monitored (i.e., residual air, pouch thickness). Also, special racking systems may need to be set up in order to provide optimal heating media flow and prevent pouch to pouch contact.
- Since pouches are more easily punctured they may require over-wrapping for distribution.
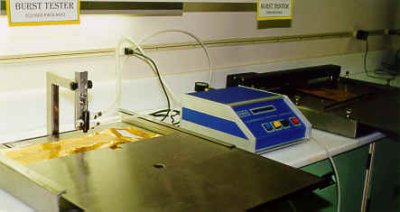
- Specialised equipment such as a burst tester, or a tensile tester is required for leak detection and container integrity evaluation.
Click on image for larger view

2.2 Pouch Material Characteristics and Specifications
The choice of materials for the manufacture of retort pouches is very important. The package must protect against light degradation, moisture changes, microbial invasion, and oxygen ingress and package interactions. The material must have sound structural integrity and be able to withstand retort temperatures as well as normal handling abuse. It must also comply with regulatory requirements. There are approximately 16 basic laminating materials with 100 different possible combinations.
Characteristics essential to a satisfactory retort pouch are:
- Low gas permeability (oxygen)
- Low moisture permeability
- Low hydrophilic properties
- Heat sealable and sterilisable
- Constructed of appropriate material
- Resistant to penetration by fats, oils and other food components
- Physical strength to resist physical abuse during packing, retorting, storage and distribution (i.e., tearing, pin-holing, fatigue, impact and abrasion)
- Absence of solvent residues. Chemically inert polypropylene films require manufacturing catalysts, which must be removed with solvents before the film can be used for foods.
- Bonding materials for the laminates must not migrate into the foods.
- High light barrier.
A processor may purchase pouches in a number of different forms. The flexible pouches can be a pre-formed three-side sealed pouch or formed as an in-line operation with the filling and sealing combined in a pouch packager. There are several retort pouch filling and sealing systems commercially available. One design is shown in figure 2.3, where the retort pouches are formed from roll stock by folding a single roll along its centerline and heat sealing the sides together. The tubular material is automatically cut to length and the bottom is sealed just prior to the product filling operation.
Control of the laminate quality begins with the component material. Close control of each raw material used in the manufacture of the retort pouch must be ensured by establishing the specifications which the final laminated pouch must meet, and by establishing an effective monitoring program. Two important properties which need to be monitored during laminate fabrication are the basis weight of the laminate and the laminate tensile strength.
2.2.1 Basis Weight of the Laminate
The basis weight of the laminate is determined by the use of a laboratory balance. A sample of the pouch material is cut from the pouch material and weighed. The equivalent weight of the sample in grams is then converted into pounds per ream.
Note: 1 ream equals 516 sheets of paper.
2.2.2 Laminate Tensile Strength
The laminate tensile strength is measured using an Instron or similar tensile tester. The bond strengths of polyester film to foil, and polypropylene film to film are measured to ensure that the retort pouch material complies with the manufacturer's specifications.
Processors generally choose the pre-formed pouches. These have three seals already formed, thus requiring a single heat bar for closing. Pouches are usually transported to the plant in master cartons of 1000 or more units.
Processors inspect empty flexible pouches prior to use for: pouch dimensions, pouch shape, correct material, and manufacturer defects (i.e., delamination, abrasions, tear notch anomalies). These observations should be recorded and those pouches not meeting the manufacturer parameters must be culled out as the hermetic integrity of the pouch may be compromised.
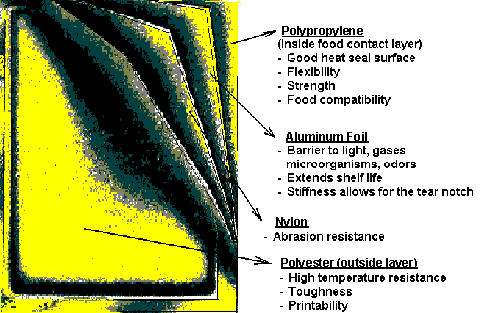
2.3 Pouch Laminates
As shown in figure 2.2, most retort pouches are constructed with a 4-ply laminate consisting of a polyester outside layer, a nylon 2nd layer, an aluminum foil 3rd layer, and a polypropylene inside layer. The aluminum foil can be laminated with either the matte or the shiny side exposed to view. Normally the matte side is to the outside. Some pouch material has polyvinylidene chloride (PVDC or SARAN®), ethylene vinyl alcohol (EVOH) or nylon instead of the aluminum foils in the middle layer. The components of the laminate are held together with adhesive, which are usually modified polyolefilms such as ethylene vinyl acetate (EVA).
Each component performs a specific function that is critical to product shelf life stability and container integrity.
In some cases a clear layer, to permit viewing of the product, replaces the foil layer. The materials of choice are generally SARAN® (PVDC), EVOH or nylon. While these plastics are good barriers to oxygen molecules, they are not complete barriers, and therefore the shelf life of the container is reduced substantially.
Click on image for larger view
2.4 Types of Pouches
2.4.1 Pre-formed Pouches
The most commonly used pouch is the pre-formed retort pouch, which has three sides that are pre-sealed by the retort pouch manufacturer.
2.4.2 In-line Formed Pouches
As shown in figure 2.3, roll stock laminate is fed through a tensioning device to ensure that the flexible pouch is smooth. A plow assembly then folds the laminate along the centerline, exposing the polypropylene surfaces to each other. (Some roll stock machines bring two separate rolls of laminate together.) The seals are formed using a heat-sealing device and the formed pouches are cut off.
One style of filler, for a liquid product, uses equipment that forms the pouch, fills and heat seals on a production-line basis. After exiting the sealer, the web of formed pouches is cut by a roller knife to separate the individual pouches.
(From Lopez, 1987, "Retortable Flexible Containers" in "A Complete Course in
Canning and Related Processes - Book II")Footnote 2
Click on image for larger view

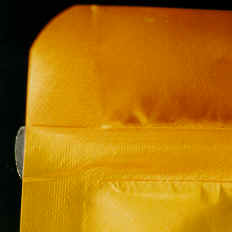
2.5 Container Terminology
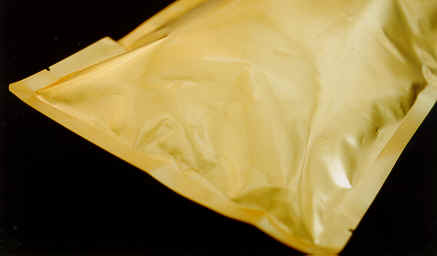
Any discussion or description of container defects requires standard terminology relating to the container components. See figures 2.4 and 2.5 for further details on pouch terminology.
- Body
- The area of the pouch located within the sealed area. The body of the pouch will vary in dimensions.
- Coding
- Lettering or numbering that is permanently marked onto the flexible pouch. Coding applied by the processor indicates the name of the processing establishment and the day, month and year of processing. The coding may be in indelible ink or in any other type of permanent marking (i.e., embossing the cosmetic seal) that is appropriate to the container.
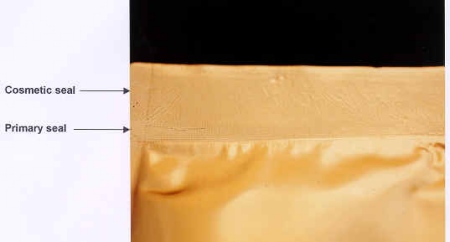
- Cosmetic seal
- A a seal applied by the processor. Its function is to provide an embossing surface or to prevent contamination of the area directly outside of the seal (refer to figure 2.4).
- Laminate
- The multi-layered construction characteristic of retort pouches. In retort pouches there are generally 4 layers that are held together with adhesive layers. Each layer of the laminate contributes in some manner to the container integrity.
- Manufacturer's seal
- The seals applied by the pouch manufacturer. In pre-formed pouches these generally occur on 3 sides of the pouch.
- Processor's seal
- The primary seal applied by the processor. This is intended to complete the flexible pouch's hermetic properties (refer to figure 2.4).
- Roll stock
- Laminate used by the processor in the production of an entire pouch.
- Seal
- The hermetic closing of the container that needs to be secure against entry of microorganisms. The hermetic seal is achieved by the fusion of two heat-sealable layers of the laminate material (i.e., polypropylene).
- Seal tensile strength
- Maximum force required to tear apart the pouch seal. Results are expressed in kg per linear mm of seal tested (pounds per linear inch of seal). Also called the bond strength of a seal.
- Seal width
- Distance across the bonded area of the pouch seal.
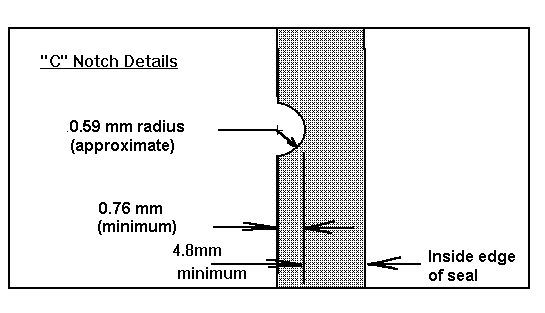
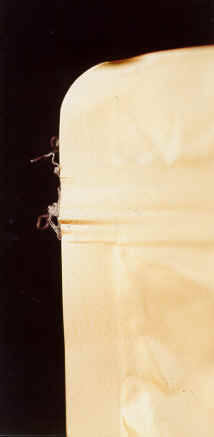
- Tear notch
- The small cut-away portion of the manufacturer's side seal that allows the container to be torn open with relative ease (refer to figure 2.5).
Click on image for larger view
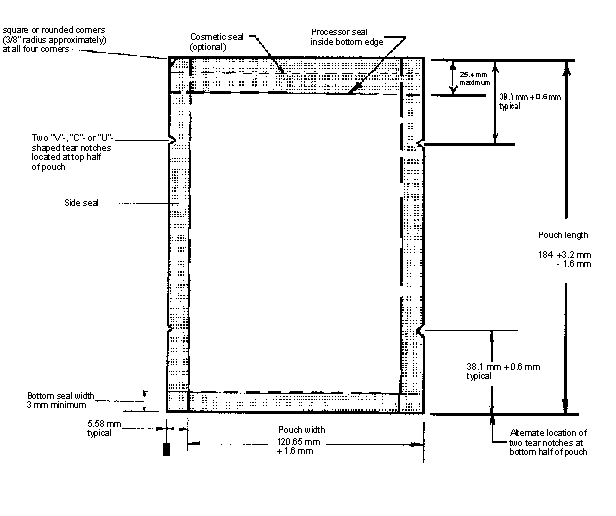
Figure 2.5 - Notch Designs
Example of "V" notch design
Click on image for larger view

Click on image for larger view

Example of "U" notch design
Click on image for larger view

Click on image for larger view

Example of "C" notch design
Click on image for larger view
Click on image for larger view

3.0 Integrity Factors
Contamination of the processor's seal area is a major problem that affects the hermetic seal of the flexible pouch. Incorrect vacuum or improper pouch handling causes this problem. For liquid products, too high a vacuum could suck product into the seal area just before heat sealing which could affect the integrity of the seal. Also, improper handling of empty pouches on-line could result in contamination of the seal during filling (i.e., post-fill drip from an overhead filler spout).
Two of the major causes of pouch failure are improper filling and sealing. Sealing with a high order of reliability must be of primary concern to the processor. Fat and water contamination of seal areas seriously reduces seal strength reliability.
Incorrect handling of pouches during processing and post process could cause physical damage to the pouch and seal, which could weaken the seal or compromise the pouch hermeticity.
Thus, flexible pouch integrity factors are concentrated in three main areas of the process and are outlined in the following sections of this manual:
- Improper filling can cause contamination of the seal area
- post-fill drip on seal from filler spout
- incorrect vacuum
- overfilling
- Improper sealing will compromise the integrity of the pouch
- Improper handling during processing or post process can cause damage to pouch and seal.
3.1 Pouch Filling
Filling pouches is a critical stage in the operation, since it is essential that the pouch be filled to the proper level with product and that the product never contacts the seal area. Overfilling the pouch must be avoided because it not only increases the potential of seal contamination and seal failure, but also could lead to under-processing due to the greater thickness.
Product dripping from the filler nozzle after the pouch has been filled is a potential seal contamination problem that must be prevented. The use of positive cut-off pumps, the removal of product drips from dispensing nozzles by blow-off or vacuum suck-back systems, and the use of moveable protective shields, which greatly reduce the chances of fouling the seal areas, are essential when fibrous foods or sauces containing particles are being packed.
In the seafood industry, smoked salmon and other fishery products are commonly hand filled into preformed pouches through a filling shield, which serves to prevent seal area contamination.
As each product has its own flow and particle size characteristics, detailed filler specifications aimed at eliminating seal area contamination are difficult to define. The following steps can be used as guidelines to minimize seal area contamination:
- Fillers should be matched to product characteristics through actual filling tests. For example, although cake dough may resemble chicken loaf mix in apparent consistency, comparative tests showed that an auger filler with a sliding-tube nozzle worked better for the chicken loaf, while a gear pump (Creamy Package stuffer) with a rotary valve nozzle performed better for cake dough.
- Nozzles should be designed with such features as:
- circumferential suction holes on nozzle tips to suck back dripping product;
- external suction rings; or
- sheetmetal guards to physically prevent drippings from contaminating seal surfaces.
- Bottom-to-top filling and no filling within a specified distance (e.g., 3.8 cm) of the top of the pouch should be specified.
- Control over the configuration of the pouch opening should be assured by means of:
- conveyor clamps on both leading and trailing pouch edges;
- air-jet assistance to initiate opening; and
- external suction cups and/or spoonbill internal forming devices.
- Controlled handling of filled pouches during and between operations will prevent contamination of the seal area.
- Measures should be in place for the removal of residual package air to prevent splashing, especially with viscous products prone to air occlusion (i.e., sugar syrup and gravy). These measures include obvious care to avoid occluded air, control over the rate of air removal, and control over product fill temperature to prevent flashing.
As shown in figure 3.1, winged or formed guards that swing into the package opening can be used at the moment of filling to physically protect the inner seal from contamination.
Click on image for larger view

3.2 Exhausting the Filled Pouch
The control of the "air content" in the filled pouch, which includes any inert non-condensable gases such as carbon dioxide, is important. The residual air content in the sealed pouch could lead to excessive stressing of the seals during the thermal processing and could significantly affect the rate of heat transfer.
In some products the "air content" is purposely entrapped in the fill material for product texture development (i.e., bakery products). In solid products (such as un-blanched meats) large amounts of gas are trapped in the tissues; also cold-filled sauces or liquids could release high volumes of non-condensable gases during the thermal process.
A producer may also backflush with an inert gas such as nitrogen. In the backflush procedure, the headspace gas must be controlled in order to remove oxygen, which will:
- extend shelf life
- protect package integrity, and
- promote uniform and predictable heat transfer.
The control of "air content" in retortable pouches must be defined as a critical process factor by the processor, if it will affect the scheduled thermal process. This is specified in the scheduled process as being the residual gas.
The product type will determine whether a vacuum sealer should be used. Some processors use steam tunnel atmosphere to complete the open, fill and seal operations. Whatever method is used, the processor must consider the factors that will result in a satisfactory final finished product. Rapid evacuation of the pouch could result in a failure to allow sufficient time for proper air removal. Rapid evacuation in a vacuum sealer will increase the chance of the seal area becoming contaminated, in products that are hot filled.
3.3 Seal Formation
A hermetic seal is achieved in retortable pouches by the fusion of two heat-sealable layers (such as polypropylene) to each other. Types of sealing methods include:
- contact sealer (hot bar or impulse)
- induction (molecules become excited and heating is by conduction)
- ultrasonic (sound waves excite the polymers to produce heat); and
- dielectric (dielectric waves cause the polymers to re-align).
The most commonly used method is the contact sealer, either with the impulse sealer or the hot bar. The processor's seal is generally applied using one of these sealing devices, either within a vacuum chamber, or without a vacuum chamber, using steam injection to remove headspace air.
There are a number of prerequisites for achieving a good seal:
- properly formed and undamaged pouches;
- the absence of foreign materials in the sealing area of the pouch (e.g., product, oil);
- the proper placement of the pouches within the jaws of the sealing machine;
- flat, smooth and parallel sealing surfaces;
- miscellaneous factors that can affect the hermetic seal such as:
- the temperature of fusion;
- the pressure created by the sealing tool holding the pieces together;
- the dwell time of the sealing tool holding the pieces together;
- sealing material compatibility; and
- seal area contamination and the condition of the sealing surface.Footnote 3
Heat-sealing temperatures must fall within the specifications provided by the laminate manufacturer. If the sealing surface is too hot, the polyester may delaminate from the foilFootnote 3. Different polymers will melt and seal at different temperatures depending on the polymer's molecular weight and elemental constitution. The most desirable polymer is one with a wide temperature range. Sealing temperature can be affected by the thermal conductivity of the sealing jaws, air or gas in the container head space, and the presence or lack of a container head space. A lower temperature of sealing may sometimes be compensated for by increasing pressure and dwell time at the sealing jaws.Footnote 3 Other factors which might be taken into consideration in forming a proper seal are the room and pouch temperature and the humidity.
An acceptable seal is one where it is impossible to distinguish the individual surfaces after tensioning a welded seal to the point of failure. The bond between the sealing layers should be stronger than the bond between the layers of the laminates. The opposing surfaces must form a total weld. A performance standard on weld strength must be established for every type of packageFootnote 4.
The presence of contaminants like moisture, oil or other food particles can contaminate the seal area and seriously affect the seal weld. The presence of foreign material can cause voids or blisters to form within the seal as heat is applied, forming a visible depression as the seal cools. Voids or food particles may also form channels that permit the inclusion of bacteria. One proactive approach that has been devised to address some of these problems is to have sealing bars with curved surfaces that squeeze out some potential contaminants as they clamp onto the pouch.
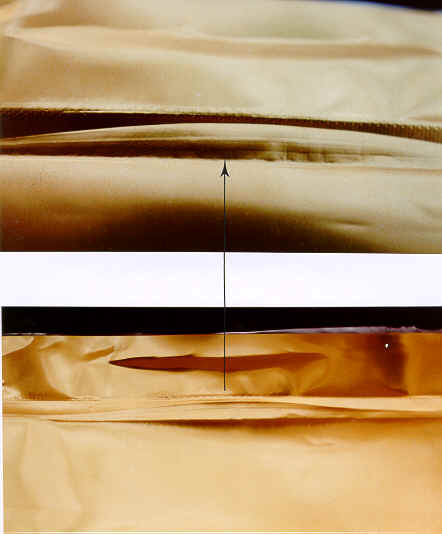
Sealing surfaces must also be smooth, flat and parallel. Contamination of the sealing bar surface can create convolutions (refer to Chapter 7 - 7.5 Defect: Contaminated Seal) or impressions on the outside surface of the sealed pouch. Seal width (as shown in figure 2.4) is an important factor.
3.3.1 Hot Bar Sealer
The "hot bar" has two sealing jaws that clamp down with pressure onto the pouch. These bars remain hot at all times and as a result it is sometimes hard to get even heating. It is advisable that a thermocouple be placed in the sealing bar, to independently measure the temperature at the sealing point.
It should be noted that the thermocouple reading (read from the control panel) might differ slightly from the actual temperature on the surface of the sealing bar. There can be a temperature gradient of several degrees between the thermocouple reading and the actual temperature on the sealing bar surface. The temperature on the sealing bar surface can be checked with a pyrometer and compared to the thermocouple reading on the control panel.
It is very important to know the sealing bar's exact surface temperature and ensure that this temperature is attained continually during production.
The processor should have specifications from the pouch supplier for sealing bar temperature, pressure and dwell time necessary to obtain a good seal. Using these specifications, it is important that the processor first validate the heat sealer by running several filled pouches through the sealer, followed by burst testing. During production, monitoring the sealing bar temperature, pressure and dwell-time and carrying out burst testing on a regular basis will demonstrate that the specifications are achieved on a continuous basis.
3.3.2 Impulse Sealer
The "impulse" sealer has two cold bars that come together under pressure. An electrical current is sent through the bar producing heat. The impulse sealer mechanism has many adjustable variables including dwell time and pressure.
(From Lampi, 1976, "Performance and Integrity of Retort Pouch Seals")Footnote 4
Click on image for larger view

3.4 Handling of Closed Pouches
Original research has been carried out at various centres for retort pouches demonstrating the potential for re-contamination as a result of manual handling of the retort pouchesFootnote 5. Manual handling has been demonstrated to expose retort pouches to a food-poisoning hazard, in addition to a commercial spoilage risk. The processor must minimize manual handling as much as possible, recognizing that the risk of re-contamination could result from either punctured or defective laminate or as a result of the seal failure. The Quality Management Program controls the sanitation procedures used by the processor during production. All equipment and surfaces contacting the pouches must not result in damage or abrasion to the pouch material.
Pouches should not be overlapped or touching while in the retort, or in other parts of the process. There is a high probability that pouch-to-pouch contact will create container defects, as the edges of the pouches are quite rigid and sharp. In the retort, pouches should be held in separate compartments that will restrain them and prevent incidental contact and the overlapping of the individual pouches, called "shingling". If the processor's practice is to overlap the loose edges of the pouches during basket loading, the processor needs to be concerned that the product inside the pouches does not overlap, as this would impact on the maximum pouch thickness specified in the thermal process. Special dividers need to be provided, which would ensure that the specified pouch thickness could not be exceeded.
Retorts should also be kept clean of rust and scale. Rust and scale may drop onto the pouches and could cause container defects such as pin-holes and scratches.
3.5 Post-Process Pouch Handling
The safe preservation of food in retort pouches is dependent on the ability of the sealed pouch to prevent re-infection by microorganisms leaking through the seals or the pouch body after the product has been heat processed. To minimize microbial contamination of the pouch's external surfaces, the processor should follow recognized sanitation requirements, dry the pouches and enclose them as quickly as possible in a protective outer-wrap.
3.5.1 Pouch Drying
Retort pouches should be properly dried after the thermal process to prevent re-infection by microorganisms leaking through the seals or pouch body. Minimizing the possibility of microbial contamination of the pouch's external surfaces can be accomplished through post-process control procedures, adequate drying of the individual retort pouches and enclosing the pouches in a protective outer-wrap as quickly as possible. Water left on the retort pouch presents a possibility that the water could reduce the strength of the permeable outer-wrap and leave watermarks or staining.
The product center temperature should be checked on a sample of pouches taken from various locations throughout the retort baskets. At the time the pouches are removed from the retort for subsequent handling/drying, the pouch temperature should be cooled to an internal temperature of 110-140°F for subsequent air cooling and dryingFootnote 6. This temperature is at the low end of the thermophilic range and thus reduces the possibility of spoilage by heat-resistant organisms.
Pouch drying is accomplished by utilizing a combination of residual heat to promote evaporation, wetting agents in the retort cooling water, and mechanical dryers, air blowers or air knives to drive off the adhering water from the pouches.
3.5.2 Outer Wrapping
The retort pouch is punctured easily by sharp objects and is susceptible to flex cracking when subjected to repeated flexing and folding. Excess flexing of the pouches will fracture the foil film and pin-holes will allow oxygen to enter the container. Excessive vibration or movement of liquid during shipping can also cause flexing. Both of these problems can be minimized by the use of appropriate filling, sealing and handling equipment in the packing plant and by the use of a correctly-sized envelope or carton for over-packing each unit.
Proper over-packaging techniques must be assessed for each product and evaluated for durability and shipping exposure. Over-packing the flexible pouch in a rigid board container so that the container gives maximum support to all surfaces of the pouch gives good protection to the seal areas from impact, especially if the case is dropped.
Individual outer-wrap on each pouch is not considered essential for distribution of retail size retort pouches. Institutional sizes are normally packed in a high-quality protective carton that will properly restrain the pouch during distribution. Prior to packing in the carton each pouch should receive a final inspection. A product label should be affixed to the pouch.
It is recommended that final protective packaging be done at the primary processing plant. If final packaging is done elsewhere, extreme care should be taken in transportation of the pouches to the final packaging location. Personnel at the final packaging location should be adequately trained to inspect the pouches prior to packaging.
3.5.3 Transit Packaging
For retort pouches, various methods of transport and final distribution procedures are used. Specific requirements for the transit packaging will vary depending on the conditions that may be encountered. The following points are normally considered in the specification of the transit package:
- The transit packaging should be able to provide protection to the individual retort pouch. It can be the protective carton as the outer case or a combination of the over-packing and the outer case. The transit packaging should be capable of supporting the weight of stacking and protecting the pouches from any handling abuse.
- The heights for palletisation and stacking of the cases should be specified to minimize the risk of compressing the pouch contents and thereby stressing the seals.
The retort pouches should not be exposed to temperature extremes during storage and transportation. At low temperatures there may be a danger of reduced flex-crack resistance and at higher temperatures there may be a danger of growth of thermophilic organisms which may have survived the thermal process. High humidity conditions may reduce the strength of the outer case.
4.0 Examination and Evaluation Process
There are a number of unique container integrity tests that can be performed on retort pouches. Appropriate methodsFootnote 7 should be obtained from the manufacturers of the containers or materials. Unfilled containers are tested for bond strength. Filled containers are tested after thermal processing.
Fusion is necessary for a good seal and exists when the opposing seal surfaces form a total weld. Such a weld is characterized by the inability to visually distinguish either opposing seal surface at the inner seal junction or after seal tensioning beyond the point of failure. On tensile failure (which can be produced by manual pulling), fusion exists when fracture of one inner ply at the seal junction occurs and there is delamination of one ply. If the seal peels away so that the inner seal surfaces are identifiable, fusion does not exist and the seals should be rejected.
Seals examined at the time of production may meet tensile and burst test criteria even though the seals do not have proper fusion. After a short (24-hour-plus) storage period, such seals may fail when subjected to handling tests such as vibration and drop cycles. Any processor producing flexible retort pouches should research the topic thoroughly to ensure that the production equipment and procedures will result in a fusion seal which will meet the seal specifications of the pouch material supplier. Destructive and non-destructive tests for assessing seals for fusion are described in the following sections.
4.1 Container Examination and Tests
The examination of retort pouches consists of a number of activities that will provide both quantitative and qualitative information:
- visual examination and external seal measurements as an initial assessment of seal integrity (this includes manufacturer's seals and tear notch area);
- burst test to assess seal strength;
- tensile test to verify seal weld (the laminate structure should fail before the welded seal fails).
4.1.1 Visual Examination
A careful external visual examination of containers and their seals is the primary means of detecting container defects. This involves:
- Removing the label from the container.
- Carefully examining the edges of each seal for any evidence of product in the seal area. No product (oil, etc.) should be visible.
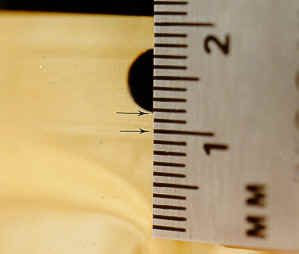
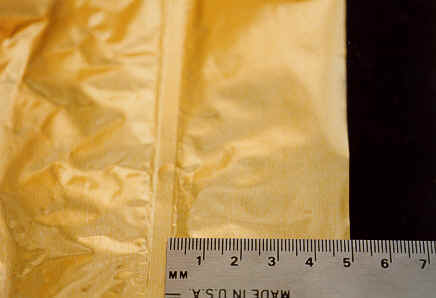
- Measuring the width of the seals (manufacturer's and processor's) at a number of locations along the seal to ensure that they meet sealing machine specifications and the required minimum width of 3 mm.
- Examining the seals by grasping the unsealed area of the laminate and exerting a steady pressure. Observe the package and pouch seals for signs of seal creep or delamination.
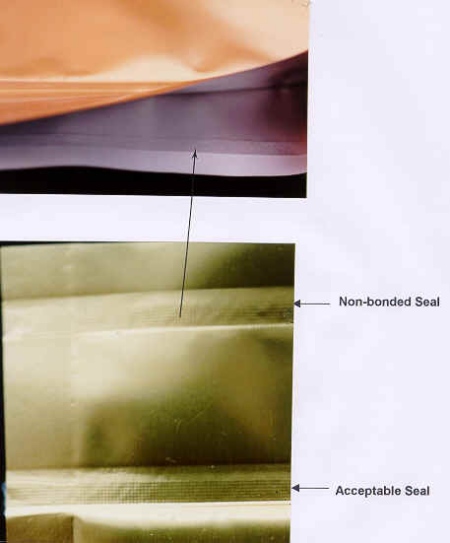
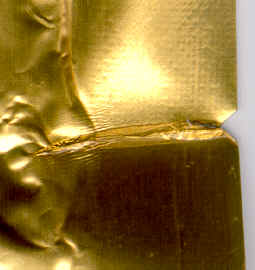
Visual examinations should be done at start up and every 30 minutes with one unit from each sealing head being tested and the results recordedFootnote 7 Footnote 8. A visual exam should also be done on the pouches slated for burst testing. Visual defects of concern include misaligned seals, flex cracking, product contamination of the seal, non-bonding, seal creep, delamination, and scratches.
Visual examinations should also be done after retorting since container damage could occur during the retorting, unloading, storage and packaging stages due to shingling of the pouches, rust in the retort and rough handling. Culls should be documented for defect type in order to assess the sealing operation.
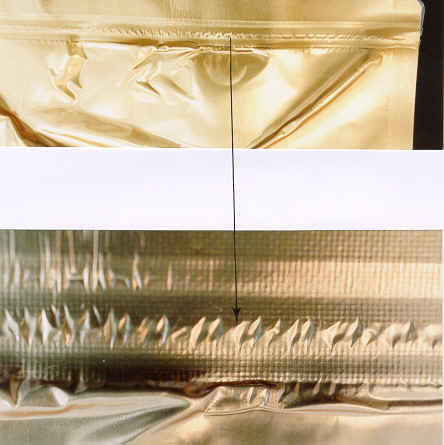
Figure 4.1 illustrates a normal fusion seal formed by a hot bar sealer and an impulse sealer. The heat seals can be either flat or profiled. Regardless of the physical shape of the sealing jaw or bar, the quality of the fused seal depends upon:
- the temperature of the sealing surface materials;
- the sealing jaw pressure;
- the sealing dwell time;
- the compatibility of the sealing materials;
- the absence of seal area contaminants; and
- the physical condition of the sealing surfaces.
Figure 4.1 Closure Seal - Visual Inspection Criteria

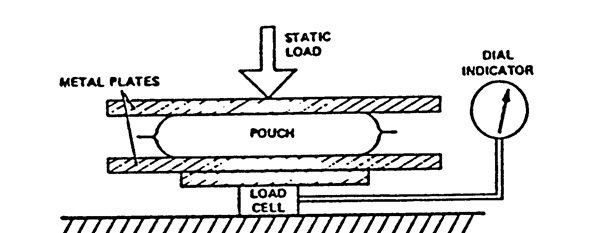
4.1.2 Static Load Burst Test
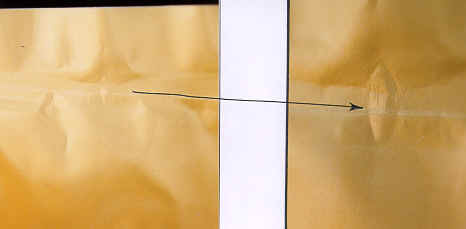
A static load burst test (also called a compression test) may be used to determine the burst strength of a pouch as an indication of correct heat sealing conditions. A filled and sealed pouch of product, water or other non-compressible fluid is placed horizontally between two horizontal parallel plates connected to a load cell and indicating dial gauge. A standard weight is placed on the top plate for a set period of time. Pouches must withstand a force of 7.5 kg for 15 mm of internal seal length applied for 15 secondsFootnote 4.
Figure 4.2 illustrates a static load being applied across the faces of the pouch. The operator records either the force at which the pouch seal fails or, if a preset maximum force is applied, the time for which the pouch is held at that force.
(From Lampi, 1976, "Performance and Integrity of Retort Pouch Seals")Footnote 4
When conducting a static load burst test the following points should be notedFootnote 9:
- The fail force of any pouch specification is related to the thickness of the filled pouch between the plates at the time of bursting. Since this thickness is determined by pouch internal dimensions and filled volume, the placement of the closing seal and product filling should be carefully controlled.
- Product temperature can have a significant effect on the results of the test. Owing to heat transfer between the pouch contents and the pouch seals, a warm product or warm water can have a weakening effect on the seal. The degree of weakening depends on the pouch specification. As an example, a change in seal temperature from 30°C to 40°C may reduce the static load test result by as much as 35%.
- The seal damage caused by the static load test is generally less than that caused by the internal burst test because the force applied to the seals is from hydraulic pressure and it is relaxed as soon as the pouch bursts. Thus the static load burst test is useful in locating and diagnosing seal faults. Also, the results of the static load burst test are generally more variable than those of the internal burst test, probably owing to the factors mentioned in points 1 and 2 above.
- If the test is conducted with actual product in the pouch, the product must be capable of transmitting a hydraulic pressure to the seals; thus solid packs cannot be used for filled pouch burst testing.
- After any burst test, intact test pouches of product must never be returned to production.
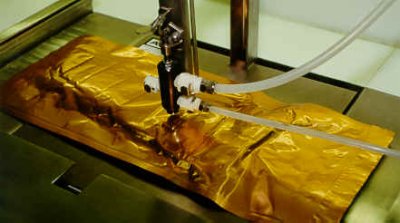
4.1.3 Internal Burst Test
The internal burst test is used as a good overall test for an hermetic seal including an indication of correct heat sealing conditions and a measure of the ability of a package to withstand transportation and handling. Internal pressure, applied by inflation with air, is used to stress the seals and the container's response is recorded.
Internal burst testing procedures involve the application of air pressure at a steady rate of 10 kPa/second (1 psig/second). Three internal burst testing procedures are as followsFootnote 10:
- The dynamic burst test, where inflation continues until the pouch bursts. The internal pressure at bursting is recorded. This test is used on fusion type seals.
- The static burst test, in which inflation is stopped at a specified pressure and is held at that pressure for 30 seconds. Pass or fail is recorded. this test is used on fusion type seals.
- The indexed burst test, in which inflation is stopped at a specified pressure such as 5 psig and held for 30 seconds, then inflated an additional 0.5 psig and held for 30 seconds, with inflation and holding periods continuing until the pouch bursts. The record includes the internal pressure at bursting and observations of seal separation. This test is used for peelable seals.
The internal burst test is to be completed before the tensile strength test.Footnote 7 It is generally recommended that internal burst tests be done before and after thermal processing as retorting and storage will reduce seal strength. LampiFootnote 4 found that after sealing, pouches passed 240 kPa (35 psig) for 30 seconds, while after retorting and storage, the pouches passed 140 kPa (20 psig) for 30 seconds.
The internal burst testing standard, as outlined in CAN/CGSB-32.302-M87 Use of Flexible Laminated Pouches for Thermally Processed FoodsFootnote 11 is 105 kPa (15 psig), held for 30 seconds with no evidence of seal rupture. Final seal width should be 3 mm or greater.Footnote 9 Note that pouches after retorting must meet these criteria, therefore, pouches prior to retorting will need to meet a higher criteria such as 140 kPa (20 psig) or greater.
There are two design types of internal burst testers.
- Four-sided tester: a needle is inserted into a filled pouch and air is applied through the needle, as illustrated in figure 4.3;
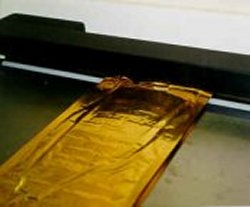
- Three-side-seal burst tester: an empty or emptied pouch is placed over an air source, the jaws are clamped to seal the pouch around the air source as illustrated in figure 4.4
In each case the pouch should be restrained. Restraint limits the angle of the seal which would otherwise increase with inflation. By limiting the angle of the seal, packages with strong seals fail at a higher pressure than when restraint is not used. This results in a noticeable difference in pressure at bursting between packages with strong seals versus weak seals.Footnote 10
For pouches where the maximum thickness is less than 13 mm (½ in.), a heavy metal plate restrains the pouch thickness so the confining space will be no greater than 13 mm (½ in.). For all other pouches the confining space will be 10% greater than the thickness of the container.Footnote 2.
Pouches are restrained between two plates, shown in the open position (top picture)
3-sided seal tester showing the open end of the pouch being connected to the air source. The top plate is shown open.
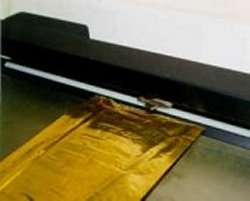
Pouch open end in position over the air source. Open end is sealed between seal-bars, which clamp together around the air source during the test.
4.1.4 Tensile Testing
Tensile tests are used as a quality assurance tool for assessing the inherent sealing qualities of flexible packaging films and are employed as an optional test. Regardless of the specifics of the technique (sample widths, equipment, and variable crosshead or jaw separation speeds), the tensile test can best be used for surveillance of the sealability of materials and as a spot check on sealing conditions and equipment operation.Footnote 4
Prior to carrying out the tensile testing, it is recommended that the heat-sealed specimens be conditioned using 23 ± 2°C (73.4 ± 3.6°F) and 50 ± 5% relative humidity as the standard conditioning atmosphereFootnote 12. A minimum of 40 hours conditioning is recommended, although some materials may require longer conditioning times. Judgment should be exercised in the selection of conditioning times and procedures, which may be necessary to meet specific test objectives.
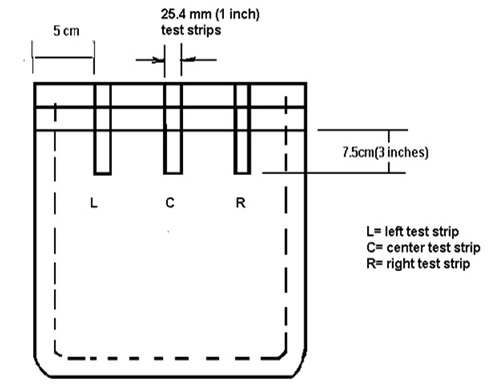
Test strips which are 25.4 mm (1 in.) wide and at least 75 mm (3 in.) long are removed from the pouch seal as shown in figure 4.5. The edges must be clean-cut and perpendicular to the direction of the pouch seal.Footnote 12
Each leg of the test strip is then clamped in the tensile testing device (as shown in figure 4.6). The sealed area of the test strip should be equidistant between the clamps and the recommended distance between the clamps is 25 to 50 mm (1 to 2 in.). The test strip must be aligned in the clamps so that the pouch seal line is perpendicular to the direction of pull. The seal must not be stressed prior to the initiation of the tensile test procedure.Footnote 12
The seam is slowly pulled apart. The rate of loading should be between 250 and 300 mm/min (10 and 12 in./min).Footnote 12 The force required to pull the seal apart recorded in newtons/metre of width (pounds-force per linear inch). At least three adjacent samples should be taken from each seal being tested and average of the sample is compared to manufacturer's specifications.Footnote 8
Sample Test Strip Positioned in Clamps


Note that the tensile test measures the total force required to cause failure over the total width of each sample strip. The detection of channels or stress points and the effect of occluded particles or other small weak areas within the seal may be obscured by the adjacent high-strength areas.
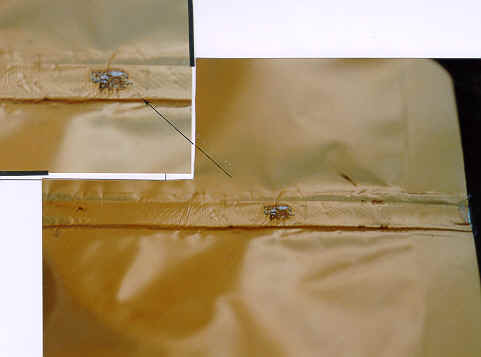
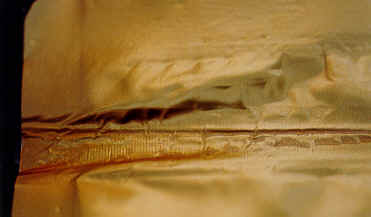
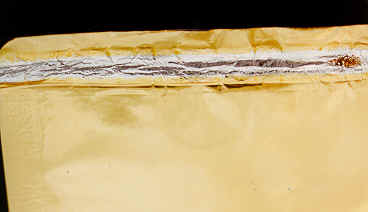
Observe the appearance of the tear at the seal. In a properly formed seal, the inner ply from each side of the pouch are fused or welded completely such that when the seal area is pulled apart, the seal does not peel apart at the original surfaces. Instead, delamination should occur such that the foil and part of the laminated layer from one side of the pouch tears off, and adheres to the seal area on the other side of the pouch. The seal should tear evenly and will appear rough and marbleisedFootnote 8 Footnote 4 as shown in figure 4.7.
Typical Failure of Acceptable Seals (with Fusion)

Typical Failure of Acceptable Seals (Lack of Fusion)

The tensile test report should include the following:
- identification of materials being tested
- seal width being tested
- test conditions (temperature and humidity)
- type of failure observed (delamination, peel or film break)
- maximum force required to cause seal failure for each test strip (expressed in N/m of test strip width, or lb/in. of test strip width)
- other pertinent information (e.g., statistical calculations, percent elongation before failure)
4.1.5 Residual Air Test - Destructive Test
The quantity of residual air can be measured during the tear down examination. The amount of allowable residual air is recorded as a part of the registered process (generally the maximum is 10 ccFootnote 3 Footnote 13, but it may vary as long as this critical factor is specified in the thermal process). Too much residual air can exert excessive pressure on the seal during retorting or result in a product cold spot. Too little residual air can result in flex cracks forming around the edges of solid product as the pouch puckers upon cooling.
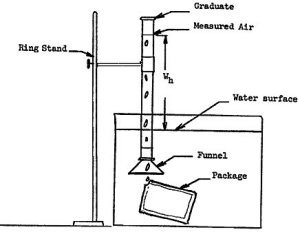
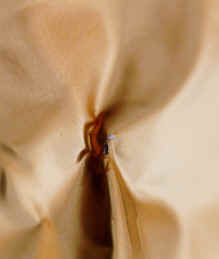
The test is performed by holding the pouch under water under a funnel attached to a graduated cylinder filled with water. A corner of the pouch is cut open under the funnel and the air is squeezed out. The amount of residual air in the pouch is measured as the water displacement in the cylinder (as shown in figure 4.8).
The volumetric measurements of air may be corrected to atmospheric pressure by Boyle's law:
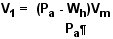
Description for picture - Formula for Boyle's law
Volume of air at atmospheric pressure equals atmospheric pressure minus pressure of water level in graduated cylinder; multiply by volume of measured air, divide by atmospheric pressure.
where:
V1 = Volume of air at atmospheric pressure (mL)
Pa = Atmospheric pressure (inches of mercury)
Wh = Pressure of water level in graduated cylinder (inches of mercury)
Vm = Volume of measured air (mL)
4.1.6 Residual Air Test - Non-Destructive Test
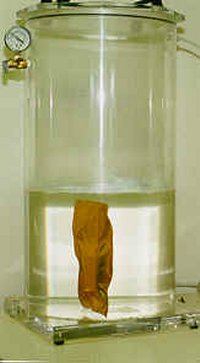
The non-destructive test involves the principle of natural buoyancy, where the volume of gas is determined by entering measured values into an equation derived from Archimedes' principle, Boyle's law, and the combined gas law. A non-destructive method to determine the volume of air in hermetically sealed flexible packages has been studied for its applicability as an acceptance test in specifications. The general principle of this method involves weighing the package while it is suspended in water and then reducing the environmental pressure until the gases in the flexible package expand sufficiently so that the package is in a state of neutral buoyancy (as shown in figure 4.9).
Processors routinely using the non-destructive testing procedure need to validate the results of the following non-destructive residual air test calculations, with destructive residual air test results.
The equation used to determine the volume of air in a flexible package is as follows:

Description of equation used to determine the volume of air in a flexible package
The volume of air (gas) in package at pressure (atmospheric pressure at the time of the test - inches of mercury) equals the pressure at time package is in a state of neutral buoyancy in water (inches of mercury) times the weight of package in water at pressure (atmospheric pressure at the time of the test) divided by the atmospheric pressure at the time of the test minus pressure at time package is in a state of neutral buoyancy in water.
where:
V1 = Volume of air (gas) in package at pressure P1 (mL)
P1 = Atmospheric pressure at the time of the test (inches of mercury)
P2 = Pressure at time package is in a state of neutral buoyancy in water (inches of mercury)
D = Weight of package in water at pressure P1 (g)
Note: the temperature is kept constant and the density of water is assumed to be 1 g/1 mL.

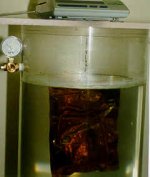
To obtain the required data for the equation, the test package is placed into a transparent cylindrical vessel containing water. The water should contain a wetting agent to minimize the effect of any air bubbles clinging to the external surface of the package. The test package is initially weighted from its position suspended in the water, just below the water surface (this is weight D).
A vacuum is then applied to the cylindrical vessel containing water and the package. The package is observed for signs of leakage, such as a steady stream of escaping bubbles from the leakage location.
To obtain neutral buoyancy, the vacuum in the transparent cylindrical vessel is increased, gradually allowing the air in the package to expand, causing the package to rise to the surface (refer to figure 4.10). The pressure is further adjusted until the package is at the neutral buoyancy position just below the water line. The pressure reading inside the vessel is taken at this point by means of a vacuum gauge and is equal to P2 in the equation.
Note that the values of P1 and P2 are in inches of mercury. A typical atmospheric reading for P1 may be 30 inches of mercury. In this case, if the vacuum gauge reading is 0 at atmospheric pressure, then a reading of 10 inches of mercury while under vacuum will be equivalent to 20 inches of mercury for the value of P2.

It may not be possible to achieve neutral buoyancy for some large size packages (850 g) which contain a very small amount of air (in the order of 1 mL or less). This condition should not detract from the value of the non-destructive test method for the following reasons:
- if the air content were so low as to be inadequate to cause or sustain neutral buoyancy, the air volume in relation to the package size would in such instances meet the required specifications; and
- it is unlikely that a precise measurement of a very low volume of air could be obtained for a package, containing actual foodstuffs, using the conventional destructive test method.
4.1.7 Dye Test
The dye test can be used to identify the location of very minute holes. The container is cut open, contents removed and the inside is cleaned to remove oil and water. The dye (containing isopropanol and rhodamine B) is squirted on the inside surface and along the inside seals with a syringe. After drying for 2 hours, the outside of the container is observed with UV light to detect dye that has penetrated through any microleaksFootnote 14.
One problem with the dye test is that the solvents used to carry the dye may attack the plastic, causing false-positive results. The dye test should be used as a diagnostic test which is used to pin-point the location of micro-sized holes that have been detected by other tests.
A number of studies have been conducted on the permeability of plain films and laminated materials to a variety of bacteria. The result of these studies demonstrates that retortable laminates do not allow bacterial penetration unless an actual fracture in the laminate exists. Where actual fractures exist, they can be readily detected by dye stain techniques that penetrate the defect. Consequently, aluminum foil flex cracks in the structure represent no immediate microbiological hazard unless the crack is accompanied by cracks in the plastic components of the laminate which would allow for dye stain penetration completely through the laminateFootnote 1.
4.1.8 Incubation Test
The retorted product is held at temperatures that would encourage the growth of "spoilage" organisms over a pre-determined period of time (i.e., 25°C for 2 weeks). If growth is detected then the hermetic barrier has been compromised. Bacterial growth may be identified through standard microbiology tests and/or the presence of gas in the container.
It is difficult to establish a non-destructive microbiological test for heat-processed pouches unless statistically acceptable sample numbers have been taken. This sample size is unacceptably high and it is not feasible to complete microbiological testing on all such samples. The best compromise is to hold all production for 10-14 days and examine for swollen or blown spoilage prior to shipping.
A small sample should be incubated at relevant temperatures for microbiological testing to accumulate trend data over a period of time. Microbiological testing of the sample pouches should be considered an inspection procedure and should not become a substitute for proper production line controls.
4.1.9 Gas Leak Detection
Gas leak detection tests have been used successfully in the detection of micro-leaks. However, the procedure, equipment and time to perform the test all combine to make this test non-production oriented.
4.2 Examination Schedule
An examination schedule should be developed in consultation with the sealing machine manufacturer and the pouch material manufacturer. The evaluation methods for seal quality may differ between package designs, pouch construction and sealing methods.
The following table 4.1 provides an example of a schedule outlining the tests conducted, factors examined, their frequency of examination and recommended sample sizes.
Table 4.1 Retort Pouch Integrity Examination Schedule
| Factors | Frequency | Sample Size |
|---|---|---|
|
At the sealing machine as often as possible. Every 30 minutes. After set-up and sealer adjustments. |
1 pouch from each sealer position. |
| Factors | Frequency | Sample Size |
|---|---|---|
| Residual gas test |
|
|
| Residual gas test | Once per retort load (post-cook) | 1 pouch |
| Factors | Frequency | Sample Size |
|---|---|---|
|
Daily.
When changing pouch size or opening a new box from the manufacturer. |
|
5.0 Defect Severity Classification
In addition to defect category and type, retort pouch defects are also classified according to severity. The following are the definitions used for severity classification of hermetically sealed and sterilized retort pouches.
5.1 Serious
A serious condition is one which provides evidence that:
- there is, or has been, microbial growth in the container contents; or
- the hermetic seal of the container has been either lost or seriously compromised; or
- the container is unsuitable for distribution and sale as stipulated in the Food and Drugs Act, section 4, and/or section 27.003 and 27.005 of the Food and Drug Regulations.
5.2 Minor
A minor condition is one which is clearly an abnormal container characteristic, but one which does not result in the loss of, or the potential loss of, container integrity (hermeticity), and consequently does not represent a potential public health risk.
6.0 Alphabetical Index/Glossary
This section provides an index of defect terminology, including alternate terminology, specific defect types, and associated defect conditions, and provides equivalent terms in French.
| English | Section | French |
|---|---|---|
| Abrasion | 7.1 | Abrasion |
| Blister | 7.2 | Cloque |
| Channel Leaker | 7.3 | Canal de fuite |
| Convultion (embossing) | 7.4 | Circonvolutions (gaufrage) |
| Contaminated Seal | 7.5 | Joint contaminé |
| Cosmetic Seal Only | 7.6 | Joint Cosmétique seulement |
| Cosmetic Seal Overlaps Primary Seal | 7.7 | Joint cosmétique empiétant sur le joint de fermeture principal |
| Crooked Seal | 7.8 | Joint irrégulier |
| Cut | 7.9 | Entaille |
| Delamination | 7.10 | Séparation des couches |
| Delamination in Seal Area | 7.10 | Séparation des couches dans la zone de scellage |
| Flex Cracks | 7.11 | Craquelures par flexion |
| Fracture | 7.9 | Rupture |
| Hot Fold | 7.12 | Repliure à chaud |
| Incomplete Seal | 7.13 | Joint incomplet |
| Leaker | 7.14 | Fuyard |
| Less than 3 mm Seal Width | 7.15 | Largeur de joint infèrieure à 3 mm |
| Misaligned Seal | 7.16 | Joint désaligné |
| Non-bonding | 7.17 | Absence de liaison |
| Notch Leaker | 7.18 | Encoche fuyante |
| Puncture | 7.19 | Perforation (trou) |
| Seal Creep | 7.20 | Fluage de joint |
| Seal Formed Greater than 25 mm from Pouch Edge | 7.21 | Joint formé à plus de 25 mm du bord du sachet |
| Stringy Seal | 7.22 | Joint filamenteux |
| Swollen Package | 7.23 | Bombage |
| Uneven Seal Juncture | 7.24 | Jointure non uniforme |
| Waffling | 7.25 | Gaufrage |
| Wavey Seal (alternate term) | 7.24 | Joint ondulé (synonyme) |
| Wrinkle | 7.26 | Ride |
7.0 Defect Categories
- 7.1 Defect: Abrasion
- 7.2 Defect: Blister
- 7.3 Defect: Channel Leaker
- 7.4 Defect: Compressed Seal
- 7.5 Defect: Contaminated Seal
- 7.6 Defect: Cosmetic Seal Only
- 7.7 Defect: Cosmetic Seal Overlaps Primary Seal
- 7.8 Defect: Crooked Seal
- 7.9 Defect: Cut (or Fracture)
- 7.10 Defect: Delamination
- 7.11 Defect: Flex Cracks
- 7.12 Defect: Hot Fold
- 7.13 Defect: Incomplete Seal
- 7.14 Defect: Leaker
- 7.15 Defect: Less Than 3 mm of Continuous Bonded Seal Width
- 7.16 Defect: Misaligned Seal
- 7.17 Defect: Non-Bonding
- 7.18 Defect: Notch Leaker
- 7.19 Defect: Puncture
- 7.20 Defect: Seal Creep
- 7.21 Defect: Seal Formed Greater Than 25 mm From The Pouch Edge
- 7.22 Defect: Stringy Seal
- 7.23 Defect: Swollen
- 7.24 Defect: Uneven Seal Juncture
- 7.25 Defect: Waffling
- 7.26 Defect: Wrinkle
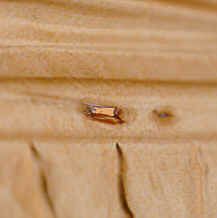
7.1 Defect: Abrasion
Classification:
Abrasion is considered a serious defect if:
- the abrasion penetrates deeper than the outer layer; or
- testing shows that there has been a loss of hermetic integrity. Deep scratches that can be felt as indentations must be tested for hermetic integrity.
Abrasions are considered to be minor defects if only the outer layer is abraded.
Description:
An abrasion is a scratch through any of the layers of the package. A serious abrasion penetrates the foil or the inner polypropylene layers.
A minor abrasion is also called a scuff. It will only affect the outer layer(s) of the pouch. The foil layer is not affected.
Common Sources:
- The pouches were manually scraped on the retort racks, other equipment or other pouches.
- Pouches rotated or shifted over top of one another (for example, if unrestrained in retorts or in bulk packaging).
- Plastic was left on the sealing bar from previous sealing.
7.2 Defect: Blister
Classification:
A blister is considered a serious defect if the width of the continuous intact seal is reduced to less than 3 mm (3/32 inch).
A blister is considered a minor defect if there are 3 mm (3/32 inch) or more of continuous intact seal.
Description:
A blister appears as a void within the bonded seal. A blister resembles a bubble or has a raised appearance in the sealed area of the retort pouch.
Common Sources:
- Food, grease or other contaminants were present in the seal area during seal formation.
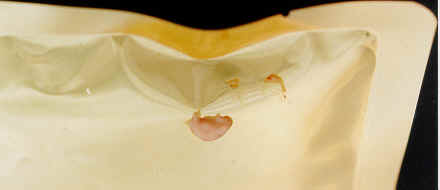
7.3 Defect: Channel Leaker
Classification:
A channel leaker is considered a serious defect.
Description:
This is an area of "non-bonding" across the width of the seal that will generally leak. If a retort pouch has a channel leaker, it can usually be detected by applying pressure towards the seal.
Common Sources:
- The sealing bar settings were not correct (i.e., the temperature, pressure and/or dwell time).
- Contaminants were present in the seal area during seal formation.

7.4 Defect: Compressed Seal
Classification:
A compressed seal is considered a serious defect if:
- there is visual evidence of seal overheating, such as bubbles or exposed foil; and
- there is less than 3 mm (3/32 inch) of continuous "good" seal (non-delaminated area) remaining.
A compressed seal is considered a minor defect if:
- there is some visual evidence of seal overheating, such as bubbles or exposed foil; and
- there is more than 3 mm (3/32 inch) of continuous "good" seal (non-delaminated area) remaining.
Description:
A compressed seal is any separation of the laminated plies in the seal area. The material bond strength is questionable in the area of the defect.
If the delamination continues into the "body" of the pouch, assess the defect under Section 7.10 Delamination.
Common Sources:
- The sealing bars were too hot during seal formation.
- Material bond strength is inadequate.
7.5 Defect: Contaminated Seal
Classification:
A contaminated seal is considered a serious defect if the seal width is reduced to less than 3 mm (3/32 inch).
A contaminated seal is considered a minor defect if the seal width is greater than 3 mm (3/32 inch).
Description:
Foreign material is trapped in the seal area. A retort pouch with contamination will have a noticeable raised area in the seal where the sealing bar has sealed over the contamination.
Common Sources:
- The seal area was contaminated during the filling stage.

7.6 Defect: Cosmetic Seal Only
Classification:
A cosmetic seal only is considered a serious defect.
If the processor has documentation indicating that the cosmetic seal is tested using the same standards and at the same frequency as a primary seal, the cosmetic seal will be assessed as if it were a primary seal.
Description:
The primary seal is incomplete or non-existent and the only seal providing the hermetic condition is the cosmetic seal.
Common Sources:
- A manufacturing step was missed.
- The primary seal sealing bar malfunctioned.


7.7 Defect: Cosmetic Seal Overlaps Primary Seal
Classification:
Cosmetic seal overlaps primary seal is considered a serious defect when the width of the primary seal is reduced to less than 3 mm (3/32 inch).
Cosmetic seal overlaps primary seal is considered a minor defect when the width of the primary seal has more than 3 mm (3/32 inch) of bonded seal.
Description:
The cosmetic seal, generally applied in a separate operation from the primary seal, overlaps into the primary seal area. The cosmetic seal must be formed before the pouch is thermally processed.
Cosmetic seals are not considered essential if the pouches are processed and handled properly. The inner edge of the primary closing seal is considered a critical factor to the hermetic seal of the pouch. The inner portion of the primary seal must be maintained as a continuous seal with a minimum width of 3 mm (3/32 inch).
Common Sources:
- The pouch was misaligned in the jaws of the cosmetic sealer.
7.8 Defect: Crooked Seal
Classification:
A crooked seal is a serious defect if the seal width is reduced to less than 3 mm (3/32 inch).
Description:
A crooked seal is a seal that is not parallel to the cut edge of the pouch.
Common Sources:
- The pouch was misaligned in the sealing jaws.
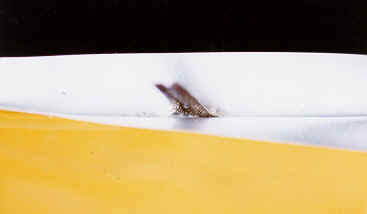
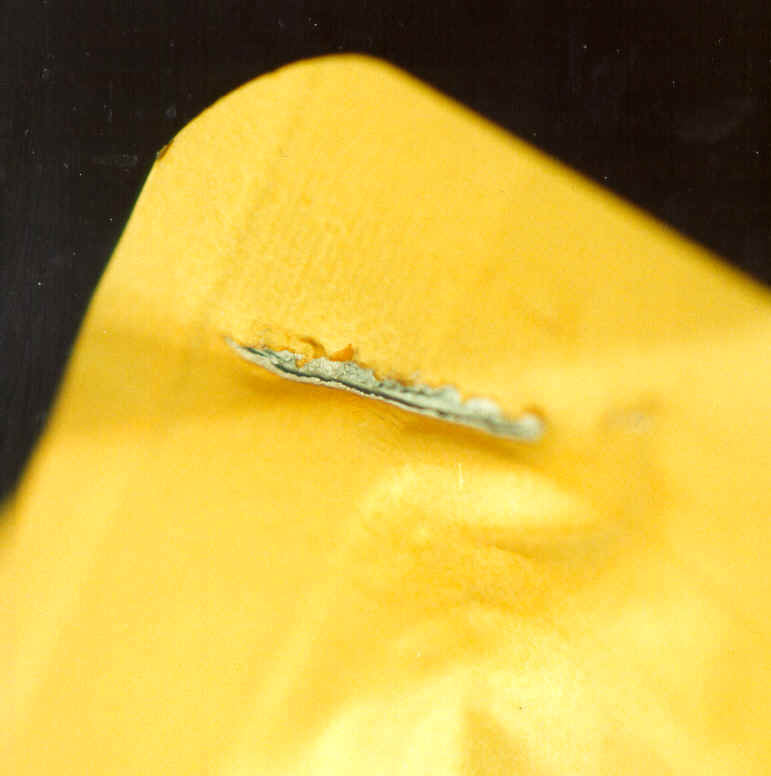
7.9 Defect: Cut (or Fracture)
Classification:
A cut is considered a serious defect.
Description:
This defect is a breach of all layers of the laminate, where the hermetic integrity of the package has been compromised. This can be a manufacturer defect if there is equipment damage or "scrap" between the laminate plies during formation. Compare to Section 7.19 Puncture.
Common Sources:
- The pouch has contacted sharp edges of other pouches.
- The pouch has contacted burrs or sharp corners on equipment.
- The pouches were abused during on-line or post-process handling.

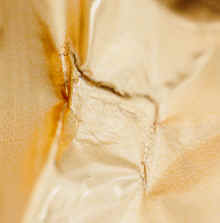
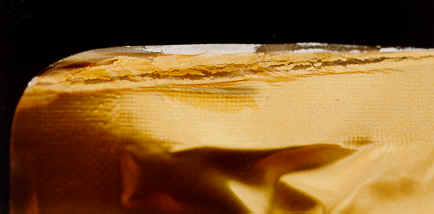
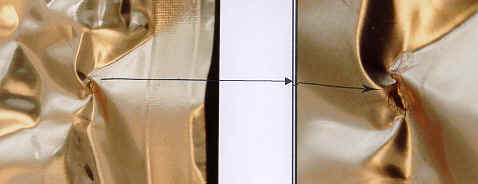
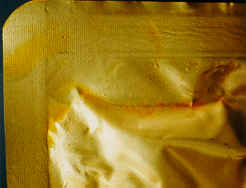
7.10 Defect: Delamination
Classification:
Delamination from the outside edge is considered a serious defect when less than 3 mm (3/32 inch) of seal width is remaining.
Delamination of the inner or outer plies, anywhere in the body of the retort pouch, in excess of 1 cm2 (or equivalent area) is considered a serious defect.
Delamination outside of the sealed area of the pouch is considered a minor defect if:
- it does not extend more than 50% from the outside edge into the seal of the polyester foil; or
- the delamination of the inner or outer plies, anywhere in the body of the retort pouch, is less than 1 cm2 (or equivalent area).
Description:
The laminate materials separate, often resulting in subsequent loss of the hermetic integrity of the pouch. This can occur anywhere on the pouch.
Some locations of the delamination do not affect the hermetic seal, but its presence can cause potential damage during distribution. Some delamination may be present at the edge of the pouch before retorting.
Delamination outside of the sealed area of the pouch, which extends from the outside edge into the seal of the polyester foil, could affect the integrity of the pouch seal strength.
Common Sources:
- If at the seal, the bars were too hot during the seal formation.
- If located elsewhere on the pouch, the material bond strength is inadequate.
- The residual air in the retort pouch was not properly controlled to eliminate sharp corners on the edge, which would make the pouch expand during retorting.


7.11 Defect: Flex Cracks
Classification:
Flex cracks are considered a minor defect.
When there is an indication that the flex crack defect has spread due to the defect location, or pouch-handling system, then the defect should be evaluated to determine if it should be classified under Section 7.10 Delamination.
Description:
Flex cracks are small breaks in the foil layer of the laminate; they appear as small cracks in the pouch surface, where only one layer of laminate is affected. The defect is similar to a delamination.
Common Sources:
- The package flexed during cooking and/or handling.
- Too much of a vacuum was drawn during sealing.


7.12 Defect: Hot Fold
Classification:
A hot fold is considered a minor defect.
Description:
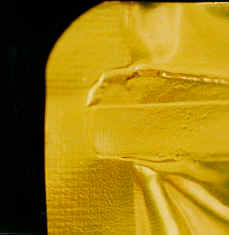
A hot fold is a permanent bend in a seal, formed after sealing and before the area has cooled. This may appear as a large wrinkle or a fold that has been sealed over.
Common Sources:
- At the sealing machine, the plastic was folded while the pouch material was still soft.
- In the retort, the edges of the pouch were folded during the cook process.

7.13 Defect: Incomplete Seal
Classification:
An incomplete seal is considered a serious defect.
Description:
The seal area does not extend completely across the width of the pouch.
This defect can be detected visually by the sealing bar impression on the retort pouch seal. The sealing bar impression provides an indication of uniform sealing bar settings (i.e., pressure, temperature and/or dwell time).
Common Sources:
- The pouch was not positioned correctly in the sealer, the result being that the impression is from the gripper instead of the forming bar.
- The pouch was positioned away from the heating section of the sealing bar.

7.14 Defect: Leaker
Classification:
A leaker is considered a serious defect.
Description:
A leaker is a retort pouch that is unsealed or in some way has lost container integrity. Contents generally seep from the pouch. The leak may occur anywhere on the pouch.
Common Sources:
- The pouch was punctured or cut during processing, handling or distribution.
- The sealing bar settings were not correct (i.e., the temperature, pressure and/or dwell time).
- The seal area was contaminated with product, moisture, grease, or other contaminants.
- The corner folded during the sealing operation, resulting in non-fusion at the corner.
7.15 Defect: Less Than 3 mm of Continuous Bonded Seal Width
Classification:
Less than 3 mm (3/32 inch) of continuous bonded seal is considered a serious defect.
Description:
The container seal area has no margin of safety to accommodate problems such as seal creep, wrinkles.
This requirement for 3 mm (3/32 inch) of continuous bonded seal is especially important in pouches where the ink stamp or embossed code is placed on the secondary or cosmetic seal. The producer should ensure that no part of any coding or stamping is placed in the primary seal area.
Common Sources:
- Defective sealing bars reduced the seal width to less than 3 mm (3/32 inch).
- Defects that cross the seal, seal creep or mechanical separation of the weld reduce the seal width to less than 3 mm (3/32 inch).
- The ink stamp or embossed code was not placed properly on the secondary or cosmetic seal.
7.16 Defect: Misaligned Seal
Classification:
Misaligned seal is a minor defect, if there is at least 3 mm (3/32 inch) of continuous bonded seal width. If there is less than 3 mm of continuous bonded seal, the defect should be classified under Section 7.15 Less Than 3 mm of Continuous Bonded Seal Width.
Description:
Misaligned seal is a seal that is not formed in a continuous, straight line.
Common Sources:
- The seal was positioned improperly.
- The sealing bars were misaligned.
- The pouch was not placed properly within the sealing jaws.
- The vacuum packer drew the top of the retort pouch over the shape of a rigid product (i.e., salmon side) while the pouch bottom lay flat on the sealing bar.

7.17 Defect: Non-Bonding
Classification:
Non-bonding is considered a serious defect.
Description:
The sealing films fail to weld (combine) during the sealing process. This defect appears as a very faint sealing bar impression on the retort pouch seal. Application of slight pressure to the seal area will cause seal failure.
Common Sources:
- The seal area was contaminated.
- The sealing bar settings were not correct (pressure/temperature/dwell time).
7.18 Defect: Notch Leaker
Classification:
Notch leaker is considered a serious defect.
Description:
A leak occurring at the manufactured notch (which is intended for easy opening of the retort pouch) has compromised the container integrity.
Common Sources:
- The machine setting at the pouch manufacturer was incorrect, allowing the notch to be cut too far into the seal.
- The notch was correctly formed but was torn in transit or during handling.
- The sealing bar settings (temperature, pressure and/or dwell time) were not correct during sealing "cold seal" next to the notch.
- The seal area was contaminated with product, moisture, grease, or other contaminants.
7.19 Defect: Puncture
Classification:
A puncture is considered a serious defect.
Description:
A puncture appears as a mechanical piercing of the pouch that results in the loss of hermetic integrity. Compare to Section 7.9 Cut.
Common Sources:
- Sharp objects such as staples, knives or other similar tools have punctured the pouch.

7.20 Defect: Seal Creep
Classification:
Seal creep is considered a serious defect when the seal width is reduced to less than 3 mm (3/32 inch).
Seal creep is considered a minor defect when the seal width has 3 mm (3/32 inch) of bonded seal present.
Description:
Seal creep appears as a partial opening of the inside border of the seal.
Common Sources:
- The sealing bar settings (temperature, pressure and/or dwell time) were not correct during sealing.
- The seal area was contaminated with product, moisture, grease, or other contaminants.
7.21 Defect: Seal Formed Greater Than 25 mm From The Pouch Edge
Classification:
Seal formed greater than 25 mm from the edge is considered a minor defect.
Description:
This defect appears as an unclosed flap between the primary seal and the top edge of the pouch.
This situation could result in water being trapped between the pouch material, making drying difficult and providing a potential location for the growth of moulds and bacteria. In order to minimize this potential hazard, it is recommended that processors consider applying a cosmetic seal to each pouch.
Common Sources:
- The seal was positioned improperly.
- The sealing bars were misaligned.
- The pouch was misaligned within the sealing jaws.
7.22 Defect: Stringy Seal
Classification:
Stringy seal is considered a minor defect if there are excessive plastic threads showing at the edge of the seal area.
When there is an indication that the stringy seal has resulted in excessive thinning of the seal area, then the defect should be evaluated to determine if it should be classified under Section 7.4 Compressed Seal.
Description:
Stringy seal appears as the presence of plastic threads emerging at the edges of the cutoff seal.
Common Sources:
- The heat and pressure at sealing were excessive.


7.23 Defect: Swollen
Classification:
This must be treated as a serious defect, unless testing proves otherwise.
Description:
The pouch bulges due to gas formation from bacterial contamination, or excess internal residual air.
The pouch must be checked for weight, microbial growth, or a chemical reaction such as hydrogen gas production.
Common Sources:
- The pouch was overfilled or a proper vacuum was not drawn, which resulted in an improper thermal process.
- The pouch leaked after processing.
- The pouch was under-processed.
- There was insufficient chlorine in the cooling water.
- The post-process handling was too rough.
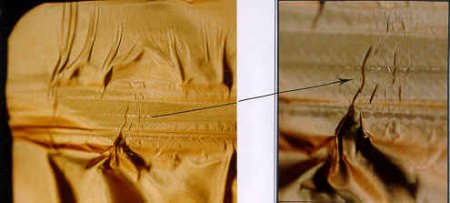
7.24 Defect: Uneven Seal Juncture
Classification:
An uneven seal juncture is considered a minor defect.
Description:
The bonded polymer at the inner seal juncture appears wavy or rough (may also be called wavy seal). This will appear as small wrinkles, but not the fold over type. The inner seal juncture may also have a wavy appearance.
Common Sources:
- The pouch was misaligned.
- The pouch laminates were heated unevenly.
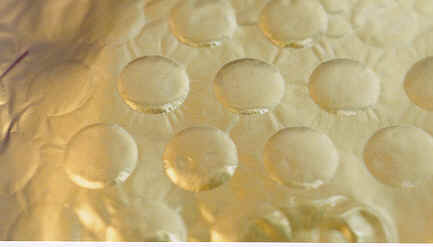
7.25 Defect: Waffling
Classification:
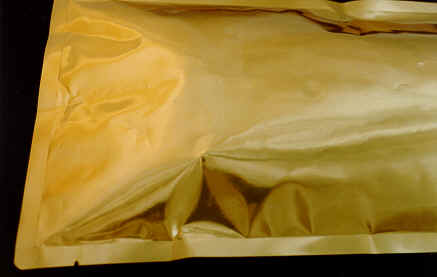
Waffling is considered a minor defect.
Description:
Waffling appears as heavy embossing of the retort tray rack pattern on the surface of the pouch body, from contact with the racks during thermal processing.
Common Sources:
- The pouch expanded against the racks during thermal processing and a heavy impression was left on the surface of the pouch material.

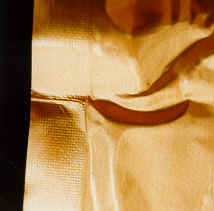
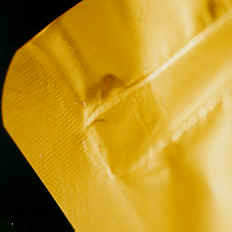
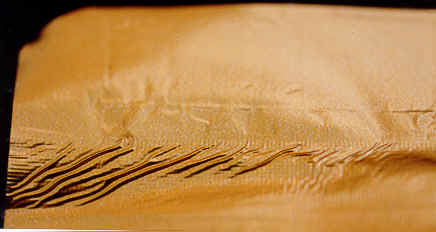
7.26 Defect: Wrinkle
Classification:
A wrinkle is considered a serious defect if:
- the fold in the seal area leaves less than 3 mm (3/32 inch) continuous acceptable seal; or
- the fold-over wrinkle extends through all plies across the seal area.
A wrinkle is considered a minor defect if it extends from the inner seal width, but does not form a channel across the entire seal area.
Description:
A wrinkle is a material fold on one seal surface, caused when one seal surface is longer than the other, at least in a localised area at the moment of seal fusion.
A wrinkle can also be a severe fold over both seal surfaces at the time of sealing. Until experience shows that these wrinkles are not hazards, they should be avoided, and seals containing such wrinkles should be rejected.
Minor wrinkles or convolutions evident on both sides of the pouch, indented on one side and raised on the other, may be caused by minor irregularities in sealing bar or anvil surfaces. These are not channels or leaks and do not constitute a hazard.
Common Sources:
- The sealing surfaces were not flat and parallel or were not tensioned properly.
8.0 Footnotes
9.0 Bibliography
American Society for Testing and Materials, Designation F1140-88, May 1988, Standard Test Methods for Failure Resistance of Unrestrained and Non-rigid Packages for Medical Applications.
American Society for Testing and Materials, Designation F88-85, January 1988, Standard Test Method for Seal Strength of Flexible Barrier Materials.
American Society for Testing and Materials, Designation F1168-88, October 1988, Standard for Use in the Establishment of Thermal Processes for Foods Packaged in Flexible Containers.
Barnes, Frank L., Paper in FDA "Course Manual - Low-acid Canned Foods", Retort Pouches, pages 197-21.
Canadian General Standards Board (CGSB) / American Society for Testing and Materials Standard, October 1986, Standard Practice for the Establishment of Thermal Processes for Foods Packaged in Flexible Containers.
Canadian General Standards Board, CAN/CGSB-32.302-M87, November 1987, Use of Flexible Laminated Pouches for Thermally Processed Foods.
Evans, K.W., R.H. Thorpe, and D. Atherton, 1978, Guidelines on Good Manufacturing Practice for Sterilisable Flexible Packaging Operations for Low-acid Foods, Technical Manual 4, Campden and Chorleywood Food Research Association Group.
Gavin, Austin, Lisa M. Weddig, 1995, Canned Foods - Principles of Thermal Process Control, Acidification and Container Closure Evaluation, The Food Processors Institute, 6th edition.
Health and Welfare Canada, 1990, Recommended Canadian Code of Hygienic Practice for Low-acid and Acidified Low-acid Foods in Hermetically Sealed Containers (Canned Foods), Minister of Supply and Services Canada.
Health Protection Branch, February 1989, Tentative Lab Procedure TMFLP-41.
Hendrickson, March 1992, Flexible Packaging used in the Thermal Processing and Aseptic Filling of Low-acid Foods, National Food Processors Association (NFPA).
Lampi, R.A., G.L. Schultz, T. Ciavarini, and P.T. Burke, 1976, Performance and Integrity of Retort Pouch Seals, Food Technology 30, 38-40, 42, 44-45, 47-48.
Lopez, Anthony, 1987, "Retortable Flexible Containers", in A Complete Course in Canning and Related Processes, Book II - Packaging, Aseptic Processing Ingredients, 12th edition. The Canning Trade Incorporated, Baltimore, MD.
McEldowney, S., M. Fletcher, 1990, A Model System for the Study of Food Container Leakage, Journal of Applied Bacteriology, 1990, 69, 206-210.
McEldowney, S., M. Fletcher, 1990, The Effect of Physical and Microbiological Factors on Food Container Leakage, Journal of Applied Bacteriology, 69, 190-205.
Mermelstein, June 1978, Retort Pouch Earns 1978 IFT Food Technology Industrial Achievement Award, Food Technology 32, 22-23, 26, 30, 32-33.
Michels and Schram, 1979, Effect of Handling Procedures on the Post-process Contamination of Retort Pouches, Journal of Applied Bacteriology, 47, 105-111.
National Food Processors Association, 1996, Bulletin 26L, Thermal Processes for Low-acid Foods in Metal Containers, National Food Processors Association, 13th edition, Washington, DC.
National Food Processors Association, Bulletin 38L, Guidelines for Evaluation and Disposition of Damaged Canned Food Containers, National Food Processors Association, Washington, DC.
National Food Processors Association, 1989, Bulletin 41L, Flexible Package Integrity Committee, Flexible Package Integrity, National Food Processors Association, Washington, DC.
National Food Processors Association, 1985, Guidelines for Thermal Process Development for Foods Packaged in Flexible Containers, P-FLX, National Food Processors Association, Washington, DC.
National Food Processors Association Lab Memorandum, September 1, 1992.
Report by Meal Ready-to-eat (MRRE) task force, July 1986, Office of the Deputy Chief of Staff for Logistics, Washington, DC
Shappee, Jonathan, Stanley J. Werkowski, June 1972, Study of a Nondestructive Test for Determining the Volume of Air in Flexible Food Packages. U.S. Army Natick Laboratories, Technical Report 73-4-GP.
United States Food and Drug Administration (USFDA), 1998, Bacteriological Analytical Manual, 8th Edition.
Weintraub, Sara, Hosahalli S. Ramaswamy, and Marvin A. Tung, 1989, Heating Rates in Flexible Packages Containing Entrapped Air During Overpressure Processing, Journal of Food Science, Volume 54, Number 6, 1989.
Whitman, W.E., January 1975, Foods Sterilised in Non-rigid Containers, Leatherhead Food RA, Layman's Guide Number 20.
- Date modified: